總覽Overview
從零認識 ContactLoopGetting to know ContactLoop
這份指南把新人從「不知道 ContactLoop 是什麼」一路帶到「能在 stg 環境建一個帳號、跑出一套測試」。內容來自實際 repo(samurai-world、ava、auto_cl)的程式碼與內部文件,不是憑空想像。This guide takes new hires from "never heard of ContactLoop" to "can create an account in stg and run a test suite." Content is sourced from the actual repos (samurai-world, ava, auto_cl) code and internal docs — not imagined.
兩大系統各做什麼What each system does
ContactLoop 由兩個互相呼叫的系統組成,合起來才是一個完整的「名單 → 觸發 → 對話 → 回寫」迴圈(Contact Loop 由此得名)。ContactLoop is made of two systems that call each other. Together they form a complete "list → trigger → conversation → write-back" loop — which is where the name Contact Loop comes from.
SW Manager(策略中樞)SW Manager (strategy hub)
Contact 的主檔:匯入、清洗、分群(Segment)、觸發(Trigger)、素材(Asset)、App Integration(接 Ava)。決定「什麼時候、對誰、做什麼」。前端 samurai-world-client(Next.js),後端 samurai-world-backend。The master record of Contacts: import, cleaning, segmentation (Segment), triggers (Trigger), assets (Asset), and App Integration (connecting to Ava). It decides "when, to whom, what." Frontend samurai-world-client (Next.js), backend samurai-world-backend.
Ava Messenger(互動引擎)Ava Messenger (interaction engine)
實際執行對話與通話:Conversation、Call、Bot 回覆、IVR、排程通話。決定「怎麼跟對方講話」。前端 ava-client,後端 ava(Laravel)。整合 Twilio / Quo / Pusher / Elasticsearch。Actually runs the conversations and calls: Conversation, Call, Bot replies, IVR, scheduled calls. It decides "how to talk to the person." Frontend ava-client, backend ava (Laravel). Integrates Twilio / Quo / Pusher / Elasticsearch.
資料怎麼流(迴圈)How data flows (the loop)
外部名單 ─► SW 建檔/清洗/分群
            │
            ▼
SW Trigger / App Integration ─► 呼叫 Ava API(以 Ava Account ID 為對接鍵)
            │
            ▼
Ava 建立 Lead / Journey ─► 發第一則訊息(Welcome / SendFirstMessageJob)
            │
            ▼
客戶回覆 ─► Ava ReplyMessageJob(AI 意圖偵測 → 一般回覆 / 預約通話)
            │
            ▼
Ava 透過 Webhook 回寫 SW(Journey Log / Opt-out)─► SW 顯示在 Contact ActivitiesExternal list ─► SW create/clean/segment
            │
            ▼
SW Trigger / App Integration ─► calls Ava API (Ava Account ID is the join key)
            │
            ▼
Ava creates Lead / Journey ─► sends first message (Welcome / SendFirstMessageJob)
            │
            ▼
Customer replies ─► Ava ReplyMessageJob (AI intent detection → general reply / book a call)
            │
            ▼
Ava writes back to SW via Webhook (Journey Log / Opt-out) ─► SW shows in Contact Activities對接鍵是 Ava Account ID。The join key is the Ava Account ID.SW 在 App Integration 設定裡用 config.api_key 存 Ava account ID 來列 Ava Campaign;Contact 透過 external_lead_entity_id、traffic_source 同步到 Ava 成為 Lead。雙向事件閉環,就是 ContactLoop。 In App Integration settings, SW stores the Ava account ID in config.api_key to list Ava Campaigns; a Contact syncs to Ava as a Lead via external_lead_entity_id and traffic_source. That bidirectional event loop is ContactLoop.
Opt-out(退訂)層級對應Opt-out levels mapping
退訂在三個層級各自獨立,跨系統要對齊:Opt-out is independent across three levels; they must align across systems:
| Ava 層級Ava level | 對應到 SWMaps to SW | 影響範圍Scope |
|---|---|---|
| account opt-out | ContactLead opt-out | 單一 Ava 帳號下的該聯絡人That contact under one Ava account |
| organization opt-out | Contact opt-out | 整個組織下的該聯絡人That contact across the whole organization |
| global opt-out | 同號碼的所有 Contact opt-out僅白名單帳號All Contacts with the same numberwhitelisted accounts only | 該電話號碼在白名單帳號範圍內退出,非真正全域That phone number opts out within the whitelisted account set — not truly global |
在 Ava Conversations 頁面實際操作 opt-out。Where opt-out is actually triggered: the Ava Conversations page.上面表格的三個層級不是抽象概念——Ava 的 Conversations 頁面(OptoutListLeadButton)就是讓客服直接選層級的地方。已 opt-out 的對話會顯示紅色圖示,滑鼠移上去顯示「Opt-out on {Level} Level」;未 opt-out 則有「Opt-out」按鈕,點下去可選 Account Level / Organization Level / Global Level 三選一,對應到 SW 這邊的 ContactLead opt-out、Contact opt-out、白名單帳號的跨卡查詢。確認彈窗文字是「This lead will be removed from your pipeline, and you won't receive any further updates.」——這是客服在 Ava 端按下去的動作,Webhook 回寫後才變成 SW 這邊看到的欄位。The three levels in the table above aren't abstract — Ava's Conversations page (OptoutListLeadButton) is where an agent actually picks a level. An already-opted-out conversation shows a red icon with a "Opt-out on {Level} Level" tooltip; otherwise there's an "Opt-out" button offering Account Level / Organization Level / Global Level, which map to SW's ContactLead opt-out, Contact opt-out, and the whitelisted-account cross-card lookup, respectively. The confirmation dialog reads "This lead will be removed from your pipeline, and you won't receive any further updates." — this is the action an agent takes on the Ava side; it becomes what you see on the SW side only after the webhook writes it back.
Opt-out 蓋的是「這張聯絡人卡」,不是「這支電話」。Opt-out stamps this contact record, not this phone number.
把聯絡人想成一張張卡片:opt-out 蓋的章(contacts.is_opt_out / do_not_email,見 Contact::optOut())只蓋在那一張卡上。一般帳號判斷要不要發送時(Contact::isMarketable())只看這張卡自己有沒有章——如果同一支電話之後又匯入一筆新資料,系統會建一張全新、沒蓋章的卡,照樣觸發發送。這不是壞掉,是現行設計。
只有寫死在程式碼裡的白名單帳號(QuoteWizardAccountManager)在判斷時,才會多查一次「同支電話、白名單範圍內,有沒有任一張卡蓋過章」,有的話才擋下。目前的白名單:CLO(帳號 111/148/149/241/246-250/254-256/285/337)、Staging(帳號 29/83)。CL1 環境目前完全沒有這份白名單(空清單),所以 CL1 上任何帳號都只做「這張卡」的檢查,同電話換一筆新聯絡人一樣會被觸發——這是 CL1 QA 常見的「明明已經 opt-out 了怎麼又發訊息」的真正原因,先查是不是換了一筆新的 contact,而非系統故障。
Think of each contact as a card. The opt-out stamp (contacts.is_opt_out / do_not_email, set by Contact::optOut()) is stamped on that one card only. For normal accounts, the send-eligibility check (Contact::isMarketable()) only looks at that card's own stamp — if the same phone number is imported again later, the system creates a brand-new, unstamped card and happily triggers it. This isn't a bug; it's the current design.
Only accounts hardcoded into a whitelist (QuoteWizardAccountManager) get an extra check: "does any card with this same phone number, within the whitelisted accounts, already have a stamp?" — and only then is the send blocked. Current whitelist: CLO (accounts 111/148/149/241/246-250/254-256/285/337), Staging (accounts 29/83). The CL1 environment currently has no whitelist at all (empty list), so on CL1 every account only checks "this one card" — importing the same phone number as a new contact will trigger it again. This is the real cause behind the common CL1 QA finding of "I opted this out, why did it send again?" — check whether a new contact record was created before assuming a system bug.
總覽Overview
三個環境:stg / cl1 / prodThree environments: stg / cl1 / prod
ContactLoop 有三個獨立部署的環境,各自有獨立的 SW 與 Ava、獨立的帳號與 Account ID。新人一律先在 stg 練習。ContactLoop has three independently deployed environments, each with its own SW and Ava, its own accounts and Account IDs. New hires always start in stg.
| 環境Env | SW Manager URL | Ava Messenger URL | 用途 / 風險Use / risk |
|---|---|---|---|
| stg Staging | staging.sw.onramplab.com |
staging.ava.onramplab.com |
開發整合測試、QA 跑測試的主要環境。🟢 低風險,可亂搞。Dev integration testing and where QA runs tests. 🟢 Low risk — break things freely. |
| cl1 CL1 | manager-cl1.contactloop.com |
messenger-cl1.contactloop.com |
Pre-prod / 客戶預覽。🟡 中風險,部分新版頁面可能還沒跟上 stg。Pre-prod / customer preview. 🟡 Medium risk — some new pages may lag behind stg. |
| prod Production | manager.contactloop.com |
messenger.contactloop.com |
正式流量、真實客戶資料。🔴 高風險,勿任意匯入或觸發。Live traffic, real customer data. 🔴 High risk — do not import or trigger carelessly. |
每個環境的 Account ID 都不同。Each environment has a different Account ID.例如 stg 的 sw_nucleus.account_id=93,cl1 是 38,prod 是 361。把 stg 的設定直接搬到 prod 一定對不上——所有設定以 conftest.py 的 ENV_CONFIG 為準。 For example, stg has sw_nucleus.account_id=93, cl1 is 38, prod is 361. Copying stg settings straight to prod will never match — all settings follow ENV_CONFIG in conftest.py.
環境版本會落差(常見困惑來源)Environments can drift (a common source of confusion)
stg 通常是最新版,cl1 / prod 的前端部署會晚一點跟上。例如 2026-08 實測:stg 的 Contacts 系列已改打 /api/contacts/grid,但 cl1 的 Marketing Sources / Endpoint Attributes / Technographics 三頁還在打舊版 /api/contacts?…size=500。測試裡這類情況會標成 xfail(預期失敗),部署跟上後自動轉 XPASS。看到 xfail 不是壞掉,是「已知環境落差」。stg is usually the newest; cl1 / prod frontend deploys follow a bit later. Example (measured 2026-08): stg's Contacts pages already call /api/contacts/grid, but cl1's Marketing Sources / Endpoint Attributes / Technographics still call the old /api/contacts?…size=500. In tests these are marked xfail (expected fail) and flip to XPASS once the deploy catches up. An xfail isn't a breakage — it's a "known environment drift."
總覽Overview
兩條上手路線,挑你那條Two onboarding tracks — pick yours
新人不一定都是工程師。這份指南分兩條路線,各自走完就能上工:Not every new hire is an engineer. This guide splits into two tracks; finish yours and you're ready to work:
產品使用者 / 營運Product user / Ops
目標:從 Ava Messenger 建立一個新帳號,一路接到 SW Manager、匯入名單、把 Segment 設到完成。不碰測試程式碼。Goal: create a new account in Ava Messenger, wire it to SW Manager, import a list, and complete a Segment. No test code involved.
→ 前往「從 Ava 建帳號到 SW Segment」→ Go to "From an Ava account to a SW Segment"
QA / 測試工程師QA / Test engineer
目標:把 auto_cl 測試專案跑起來,在 stg 跑出一套綠綠的 E2E 報告。需要會一點 Python / 終端。Goal: get the auto_cl test project running and produce an all-green E2E report in stg. Needs a little Python / terminal.
兩條路線都建議先讀上面的「ContactLoop 是什麼」與「三個環境」,後面的頁面功能章節則是共用參考。Both tracks assume you've read "What is ContactLoop" and "Three environments" above. The page-function sections after are shared reference.
SW 登入後導覽Post-login tour
登入 SW Manager 後,畫面長這樣Inside SW Manager after you log in
這一章帶你走一次登入後的整體畫面,再由上到下把左側選單的每個項目逐一介紹。選單結構取自 samurai-world-client 的 src/app/configs/routes.tsx;有 需 system-admin、功能旗標、開發中 標記的項目,在某些環境或帳號會看不到,屬正常。This chapter walks you through the overall layout after login, then introduces every left-sidebar item top to bottom. The menu structure comes from samurai-world-client's src/app/configs/routes.tsx. Items marked system-admin, feature flag, or coming soon may be hidden on some environments or accounts — that's expected.
① 整體畫面:頂部列 + 左側選單 + 主內容① The overall layout: top bar + left sidebar + main content
② 頂部列三個區塊細講② The three zones of the top bar
/);若人在 Admin (All Organizations) 檢視中,點 logo 是一個「真正的頁面載入」離開 admin 檢視,不是前端切換。手機版側選單裡也有同一份 logo。The samurai vector logo, top-left. Clicking goes to Home (/). Inside an Admin (All Organizations) view, clicking it is a real page load that leaves the admin view, not a client-side transition. The mobile drawer repeats the same logo.AdminBreadcrumb。⚠️ 待再確認:crumb-account-button 與 BreadcrumbTrigger 看起來是同一元件的不同部位而非兩代,舊版 Ant Select 疑似已被 CT1550 取代、找不到蹤跡,「三代並存」的說法有待核實。2026-08-25/26(LT622)新增 Organization 搜尋框:org 數 > 6 才顯示,只搜 org 名稱不搜 account 名稱。The breadcrumb switcher right of the logo, showing the current Organization ▸ Account. Open it to: pick another Organization, pick an Account within an Org, or choose "All Accounts" for an org-wide aggregate. Switching Account stays on the same page and re-fetches for that account; switching Organization lands on Home's org-aggregate view. Inside an admin view it becomes AdminBreadcrumb. ⚠️ Unverified: crumb-account-button and BreadcrumbTrigger look like different parts of the same component rather than two generations; the legacy Ant Select appears to have been replaced by CT1550 with no trace left — the "three generations coexist" claim needs confirming. As of 2026-08-25/26 (LT622) there's an Organization search box: it only appears once there are more than 6 orgs, and searches org names only, not account names.auth.logout() 再導向 /。Top-right: your name + avatar (initials with a name-hashed color when no photo). The account menu shows your name/email, lists your Organizations (switchable from here), and a red Sign out at the bottom. Sign-out calls auth.logout() then redirects to /.左右選單的關係:左側選單的內容會依「目前選的 Account / Org」與你的角色動態變動——例如 system-admin 才看得到 Configuration / Settings / Admin;Conversion Tracking 要帶 conversion_tracking 旗標且在具體 Account 下才出現;Partnership conduit 只有帳號 31 看得到。所以「我選單比同事少幾項」通常是 scope 或權限差異,不是 bug。Sidebar is dynamic: what appears depends on the selected Account/Org and your role — e.g. only system-admin sees Configuration / Settings / Admin; Conversion Tracking needs the conversion_tracking flag AND a concrete account; Partnership conduit only shows for account 31. So a shorter menu than a colleague's is usually scope/role, not a bug.
③ 左側選單逐項(由上到下)③ Left sidebar, item by item (top to bottom)
🏠Home /
登入後的第一個畫面。儀表板顯示 Ava journey 報表與 contacts 概覽(HomeDashboard),進頁打 /ava_journey_reports 與 /api/contacts。若在 Org 彙總 scope 下進入,會讀 ?organization_id= 顯示整個 Org 的彙總。The first screen after login. The dashboard shows Ava journey reports and a contacts overview (HomeDashboard); on load it calls /ava_journey_reports and /api/contacts. Under an org-aggregate scope it reads ?organization_id= and renders the org-wide aggregate.
📒Contacts 群組
聯絡人系列。主列表側欄現在顯示為「Contacts」(LT641 把側欄標籤從「Contacts-27」改名,程式內部路徑/API 仍叫 contacts-27,不影響操作);其餘是依維度拆分的 thin-clone、對外 API 文件、CSV 匯入,以及保留的舊版列表。子項目順序如下。The contacts family. The main list's sidebar label is now "Contacts" (LT641 renamed the sidebar label from "Contacts-27"; the internal path/API is still contacts-27, no behavior change); the rest are dimension thin-clones, the public API doc, CSV import, and retained legacy lists. Children, in order:
/api/contacts/grid,回應 data.rows / data.lastRow。2026-08 起前端改版,日常操作用這頁。側欄標籤 2026-08 底(LT641)由「Contacts-27」改為「Contacts」。Main contact list, ag-grid style, calls /api/contacts/grid, returns data.rows / data.lastRow. Frontend redesigned 2026-08; use this day-to-day. The sidebar label was renamed from "Contacts-27" to "Contacts" in late 2026-08 (LT641).Organizations 旗標開啟且 Org/All-Accounts scope 下出現;單一 Account 下方隱藏。Org scope 下會被釘在群組最上,並可能改名為 Contacts (All Account)。Cross-account contacts roll-up; appears only with the Organizations flag and at org / All-Accounts scope, hidden under a single account. Pinned to the top of the group at org scope, may be relabeled Contacts (All Account).phone, first_name, last_name, email, external_lead_id, traffic_source。template 類型帳號會隱藏此入口。CSV contact import, opens in a new tab. Fields: phone, first_name, last_name, email, external_lead_id, traffic_source. Hidden on template-type accounts.size=20 分頁,回應 data.result.contacts / meta。保留但建議改用 Contacts-27。Legacy list, size=20 pagination, returns data.result.contacts / meta. Retained; prefer Contacts-27./api/contacts/grid。LT641 起已從側欄移除,新人在側欄找不到這個項目;頁面本身還在,可用網址直達。Legacy ag-grid (SSRM), also calls /api/contacts/grid. Removed from the sidebar as of LT641 — new hires won't find this in the sidebar. The page itself still exists and is reachable by direct URL.size=500,結構與 Contacts 相同。對外 production 隱藏(WIP),且 LT641 起已從側欄移除;頁面本身還在,可用網址直達。Legacy, calls size=500, same structure as Contacts. Hidden on external production (WIP), and removed from the sidebar as of LT641; the page itself still exists and is reachable by direct URL.💬Messenger /messenger MESSENGER_URL
CL Messenger 的對話歷史入口(獨立頁,Phase 1)。只有部署環境有設 MESSENGER_URL 才會出現;CLO 對外 production 另由 WIP 機制隱藏。未設定 = 功能不存在,整個入口不渲染。Entry to CL Messenger conversation history (standalone page, Phase 1). Appears only when the deployment sets MESSENGER_URL; CLO external production is also WIP-hidden. Unset = the feature doesn't exist and the entry isn't rendered.
⚡Actions 群組
Ava journey 報表(Ava 互動紀錄)系列。主頁打 /ava_journey_reports,回應含 meta.totals 與 meta.completeness;注意 Total: Filtered 大範圍會被 ES bucket 截斷。整個群組在 CLO 對外 production 隱藏。The Ava journey report (Ava interaction logs) family. The main page calls /ava_journey_reports; the response carries meta.totals and meta.completeness — note a broad Total: Filtered gets truncated by the ES bucket. The whole group is hidden on CLO external production.
Organizations 旗標開啟時出現;Org/All-Accounts scope 下為唯一顯示項。Cross-org actions roll-up; appears only with the Organizations flag, and is the sole item shown at org / All-Accounts scope.📊Unified Activity /unified-activity MESSENGER_URL
內嵌 CL Messenger 的 Conversations(embed 模式),緊接 Actions 群組之後。同 Messenger 入口的 gating:MESSENGER_URL 未設則不出現;CLO 對外 production 隱藏。對所有登入者可見(不分角色)。這是 CEO 直接要求、以同一個 SSO 身分從 Manager 直達 Messenger 對話紀錄的功能,底層的 chromeless embed + SSO 深連結機制詳見 Ava 登入後導覽 → Embed Mode + SSO 深連結。Embeds CL Messenger's Conversations, placed right after the Actions group. Same gating as the Messenger entry: hidden when MESSENGER_URL is unset, and WIP-hidden on CLO external production. Visible to all logged-in users regardless of role. This delivers a CEO-driven requirement — reaching Messenger conversation history from Manager under the same SSO identity — the underlying chromeless embed + SSO deep link mechanism is detailed at Ava post-login tour → Embed Mode + SSO deep link.
🖥️Admin 群組 system-admin
Admin (All Organizations) 管理殼,只有 system-admin 看得到。後端/API policy 是最終防線(直接打 URL 也會擋)。前三項是跨 Org 彙總,會被提升到 admin 導覽頂端。The Admin (All Organizations) management shell, visible only to system-admins. Backend/API policy is the final enforcement (direct URL hits are blocked too). The first three are cross-org roll-ups promoted to the top of the admin nav.
📈Reports 群組
舊版報表。Legacy reports.
/ava_journey_reports。Legacy, calls /ava_journey_reports./contact_reports。週視圖以週日起算(對齊 CLM)。Legacy, calls /contact_reports. Week view starts on Sunday (aligned with CLM)./visitor_reports。週視圖同樣週日起算。Legacy, calls /visitor_reports. Week view also starts on Sunday.🎯Conversion Tracking 群組 conversion_tracking 僅 Account scope
轉換追蹤。整個群組由 conversion_tracking 旗標 + 具體 Account scope 控制(Org/All-Accounts 下整群隱藏,因為定義是 account-level NOT NULL account_id)。沒帶旗標的環境看不到此群組。Conversions 與 Google Offline Conversions 已接真實後端,Meta 為預留槽。Conversion tracking. The whole group is gated by the conversion_tracking flag AND concrete-account scope (hidden at org/All-Accounts scope, since definitions are account-level with NOT NULL account_id). Envs without the flag see no group. Conversions and Google Offline Conversions read the real backend; Meta is a placeholder.
🎛️Configuration 群組 system-admin
策略設定模組,僅 system-admin。決定「對誰做什麼」的核心。Strategy settings, system-admin only. The core of "to whom, what."
/api/accounts/{aid}/segments/{sid}/get-segment-contact-count;匯入命中規則的聯絡人會讓 count +1。Contact segmentation rules. Count API: /api/accounts/{aid}/segments/{sid}/get-segment-contact-count; importing a contact that matches a rule makes count +1.rcs 旗標開啟時出現(插在 Assets 之後),目前仍在 backend 整合/mock 階段。RCS message assets. Appears only with the rcs flag (inserted after Assets); still in backend-integration / mock stage.⚙️Settings / Admin 群組 system-admin
營運/合規與帳號設定,僅 system-admin(整群 gate 也會連帶隱藏沒有自身 role 的 App Integrations)。Ops/compliance and account settings, system-admin only (the section-level gate also hides App Integrations, which has no per-item role of its own).
🔑API Key /apikeys
管理帳號的對外 API key。key rotation 目前無自動化,需手動更新。Manage the account's public API keys. Key rotation isn't automated yet — update manually.
📋Batch Jobs /batch-jobs
批次任務佇列。Batch job queue.
📖Documentation 群組
對外 API 文件與使用者指南。Public API docs and the user guide.
👤Profile /profile
個人設定。Personal settings.
🔗Partnership conduit 群組 限帳號 31
Partnership Conduit 整合。整個群組由目前帳號的 partnership_conduit_enabled 旗標 gate(目前僅帳號 31),其他帳號完全看不到。DB 驅動、無自服務 UI,換帳號後下次載入才反映。Partnership Conduit integration. The whole group is gated by the current account's partnership_conduit_enabled flag (account 31 only today); every other account sees nothing. DB-driven, no self-serve UI; reflects on next load after switching accounts.
⏭️To be removed 群組
即將淘汰的舊功能暫留區。Holding area for features slated for removal.
NewLiteCampaignFeature 旗標開啟時出現,且限 system-admin / Sales 角色。Lite campaign requests page; appears only with the NewLiteCampaignFeature flag, restricted to system-admin / Sales roles.想看每頁的「欄位 / 按鈕 / 後端 API / 陷阱」細節,到下一章 SW Manager 各頁面功能 的卡片清單;Auth 三頁(登入/註冊/忘記密碼)的逐鍵詳解在 Ava Messenger 頁面。Ava Messenger(app 那邊)的左側選單導覽若也需要,再跟我說,我用同樣方式補一篇。For per-page detail (fields / buttons / backend API / gotchas), see the next chapter SW Manager page functions; per-button detail for the three Auth pages is under Ava Messenger pages. If you'd like the same guided tour for the Ava Messenger sidebar, just say so and I'll add one.
頁面功能Pages
SW Manager 各頁面功能SW Manager page functions
以下清單整理自 samurai-world-client 的 src/pages 路由與 auto_cl 的頁面 → API 對應表。新版 / 舊版 / 需 admin 標出權限或版本狀態。The list below is compiled from the samurai-world-client src/pages routes and the auto_cl page → API map. New / Old / admin only mark permission or version status.
Home / 總覽Home / overview
HomeDashboard 元件。進頁會打 /ava_journey_reports 與 /api/contacts。First screen after login — shows Ava journey reports and a contacts overview. HomeDashboard component. On load it calls /ava_journey_reports and /api/contacts.Contacts 系列(聯絡人)Contacts family
/api/contacts/grid,回應 data.rows / data.lastRow。2026-08 起前端改版。側欄標籤 2026-08 底(LT641)由「Contacts-27」改為「Contacts」,路徑不變。Main contact list, ag-grid style, calls /api/contacts/grid, returns data.rows / data.lastRow. Frontend redesigned as of 2026-08. Sidebar label renamed from "Contacts-27" to "Contacts" in late 2026-08 (LT641); the path is unchanged.size=20 分頁,回應 data.result.contacts / meta。Old list, size=20 pagination, returns data.result.contacts / meta./api/contacts/grid。LT641 起已從側欄移除,只能用網址直達。Old ag-grid, also calls /api/contacts/grid. Removed from the sidebar as of LT641 — reachable only by direct URL.size=500,結構與 Contacts 相同。LT641 起已從側欄移除,只能用網址直達。Old, calls size=500, same structure as Contacts. Removed from the sidebar as of LT641 — reachable only by direct URL./api/contacts/grid。Splits contacts by marketing source; switched to /api/contacts/grid as of 2026-08./account-api-keys。這是給客戶看的 API 契約,欄位必須與 backend 一致。Public API reference for Add Contact V2 (hand-maintained MDX). Calls /account-api-keys. This is the customer-facing API contract — fields must match the backend.phone, first_name, last_name, email, external_lead_id, traffic_source。stg 的新版 UI 已移到 Contacts 子選單,並以新分頁開啟。CSV contact import. Fields: phone, first_name, last_name, email, external_lead_id, traffic_source. The stg new UI moved this under the Contacts submenu and opens it in a new tab.Actions 系列(Ava 互動紀錄)Actions family (Ava interaction logs)
/ava_journey_reports,回應含 meta.totals 與 meta.completeness。注意 Total: Filtered 大範圍會被 ES bucket 截斷(見 Q&A)。Main Ava journey report page, calls /ava_journey_reports, response includes meta.totals and meta.completeness. Note: a broad Total: Filtered gets truncated by the ES bucket (see Q&A).Organizations 旗標開啟時出現,側欄排在 Actions 之後第二位(不是群組最後一項)。點組織名會 shallow-push ?organization_id=,頁面須讀 live router.query 而非 SSR 的 stale query(已知 QA-fail 點)。Cross-org actions roll-up; appears only with the Organizations flag, and sits second in the sidebar right after Actions (not last in the group). Clicking an org name shallow-pushes ?organization_id=; the page must read live router.query, not the stale SSR query (a known QA-fail point).Reports(舊版報表)Reports (legacy)
/ava_journey_reports。Legacy, calls /ava_journey_reports./contact_reports。週視圖以週日起算(對齊 CLM)。Legacy, calls /contact_reports. Week view starts on Sunday (aligned with CLM)./visitor_reports。週視圖同樣週日起算。Legacy, calls /visitor_reports. Week view also starts on Sunday.策略與設定模組Strategy & settings modules
/api/accounts/{aid}/segments/{sid}/get-segment-contact-count。匯入命中規則時 count +1。Contact segmentation rules; count API: /api/accounts/{aid}/segments/{sid}/get-segment-contact-count. Importing a contact that matches a rule makes count +1.合規 / 營運設定Compliance / ops settings
組織 / 帳號 / AdminOrganization / accounts / Admin
crumb-account-button 與 BreadcrumbTrigger 目前看起來是同一個元件的不同部位,不是兩代;程式碼裡的 JSDoc 註解顯示舊版 Ant Select 已被 CT1550 取代,找不到蹤跡。實際是否還有「三代並存」有待核實,先當作單一元件理解。Account management and switching. ⚠️ Unverified: crumb-account-button and BreadcrumbTrigger currently look like different parts of the same component, not two generations; a JSDoc comment in the code indicates the legacy Ant Select was replaced by CT1550 and no trace of it remains. Whether "three generations coexist" still holds needs confirming — treat it as one component for now.POST /api/auth/login 取 access_token。Email + password login, POST /api/auth/login to get an access_token.Ava 登入後導覽Ava post-login tour
登入 Ava Messenger 後,畫面長這樣Inside Ava Messenger after you log in
Ava Messenger(ava-client)是營運人員看對話、通話、Bot 的地方。這一章先帶整體畫面,再把左側選單逐項介紹。Ava 跟 SW 最大的 UI 差別:帳號選單是階層式 Cascader(Account ▸ Campaign),且左側選單會依「有沒有選 Account / 有沒有進入 Campaign」切換成三種內容。標記:僅 system-admin、限特定角色、開發中/預留。Ava Messenger (ava-client) is where ops staff view conversations, calls, and bots. This chapter covers the overall layout first, then walks the left sidebar item by item. The big UI difference from SW: the account selector is a hierarchical Cascader (Account ▸ Campaign), and the left sidebar switches between three contents depending on whether an Account is selected and whether you're inside a Campaign. Markers: system-admin only, specific roles, placeholder.
① 整體畫面:頂部列 + 左側選單 + 主內容① The overall layout: top bar + left sidebar + main content
② 頂部列三個區塊細講② The three zones of the top bar
/static/images/logo.png)。點下去回首頁 Dashboard(/)。The Ava logo top-left (/static/images/logo.png). Clicking returns to the Dashboard (/).Cascader,changeOnSelect)。第一層選 Account,第二層選該帳號下的 Campaign;顯示成 AccountName (ID: n) / CampaignName (ID: m)。下拉頂端有「Search account」搜尋框(只搜帳號、不搜 campaign,避免破壞階層);底部有「Create New Account」(需 ACCOUNT_CREATE 權限,且要先連結 Google)。選了會 dispatch changeActiveAccount / changeActiveCampaign 並 router.push('/')。帳號會依 name 前綴(「Group - Account」)分組排序。The hierarchical selector right of the logo (Ant Cascader, changeOnSelect). Pick an Account on the first level, then a Campaign under it; it displays as AccountName (ID: n) / CampaignName (ID: m). The dropdown has a "Search account" box at the top (accounts only, not campaigns, to preserve the hierarchy) and a "Create New Account" button at the bottom (needs ACCOUNT_CREATE permission and a linked Google account). Selecting dispatches changeActiveAccount / changeActiveCampaign and router.push('/'). Accounts are grouped/sorted by the name prefix ("Group - Account").ACCOUNT_EXTERNAL_APP_INTEGRATE 權限,會出現 Profile 區塊讓你 Link Google / Facebook(已連結顯示 Linked);接著是 UI Settings(打開側欄設定抽屜)、Help?(連到 Ava Notion 文件)、Signout 登出。Top-right: avatar + your name + ▾. The dropdown shows your name and email at the top; if you have ACCOUNT_EXTERNAL_APP_INTEGRATE permission, a Profile section lets you Link Google / Facebook (shown as Linked once connected); then UI Settings (opens the sidebar settings drawer), Help? (links to the Ava Notion docs), and Signout.Ava 左側選單是「情境式」的,會依 cascader 的選擇切換:
① 選了 Account、沒進 Campaign → 帳號層級選單(Dashboard / Campaigns / Bots / Conversations … + Admin 群組)。
② 進入某 Campaign → Campaign 選單(Dashboard / Conversations / AI / Web Chat / Stats / Settings)。
③ 沒選任何 Account → 只剩 Admin 群組。
另外 system-admin 看得到全部;一般帳號角色(Owner / Analyst / ExternalTrainer / InternalTrainer / AccountAdmin)只看到該角色被允許的項目——例如 Bots、Voice Messages 與整個 Admin 群組都只有 system-admin 看得到。Ava's sidebar is contextual and switches with the cascader:
① Account selected, no Campaign → account-level menu (Dashboard / Campaigns / Bots / Conversations … + Admin group).
② Inside a Campaign → campaign menu (Dashboard / Conversations / AI / Web Chat / Stats / Settings).
③ No Account selected → only the Admin group.
Also system-admin sees everything; normal account roles (Owner / Analyst / ExternalTrainer / InternalTrainer / AccountAdmin) see only what their role permits — e.g. Bots, Voice Messages, and the whole Admin group are system-admin only.
③ 左側選單逐項(三種情境)③ Left sidebar, item by item (three contexts)
情境 A · 帳號層級選單(選了 Account、沒進 Campaign)Context A · Account-level menu (Account selected, no Campaign)
來源:AccountsMenuItems(activeAccountId),尾端接 Admin 群組。路由前綴 /accounts/{aid}/…。Source: AccountsMenuItems(activeAccountId), with the Admin group appended. Routes are prefixed /accounts/{aid}/….
🏠Dashboard /
登入後預設落地頁。所有帳號角色可見。若你沒有 CAMPAIGNS_DASHBOARD_LIST 權限又正在某 Campaign 內,會被自動導到該 Campaign 的 Call Performance Stats。The default landing page after login. Visible to all account roles. If you lack CAMPAIGNS_DASHBOARD_LIST permission while inside a Campaign, you're auto-redirected to that Campaign's Call Performance Stats.
📊Campaigns /accounts/{aid}/campaigns Owner/Analyst/Trainer/AccountAdmin
該帳號下的 Campaign 清單與管理入口。從這裡進入某個 Campaign 後,左側選單會切換成「情境 B」的 Campaign 選單。The list and management entry for this account's Campaigns. Entering a Campaign from here switches the left sidebar to the Context-B campaign menu.
🤖Bots /accounts/{aid}/bots 僅 system-admin
Bot 管理頁。roles: [] 代表只有系統管理員看得到(一般帳號角色看不到此項)。Bot management. roles: [] means system-admin only — normal account roles don't see this item.
💬Conversations /accounts/{aid}/conversations
帳號層級的對話總覽(所有 Campaign 的對話)。所有帳號角色可見。Campaign 內另有更窄的 Conversations 檢視(見情境 B)。Account-level conversation overview (across all campaigns). Visible to all account roles. A narrower in-campaign Conversations view exists in Context B.
📞Phone Numbers 群組 Owner/Analyst/Trainer/AccountAdmin
電話號碼管理與健康度。Phone number management and health.
📈Stats 群組 Owner/Analyst/Trainer/AccountAdmin
帳號層級的統計報表。Account-level statistics.
📋Leads /accounts/{aid}/leads Owner/Analyst/AccountAdmin
Lead 清單(不含 Trainer 角色)。Lead list (excludes Trainer roles).
📋Webhooks /accounts/{aid}/webhooks Owner/Analyst/AccountAdmin
帳號層級的 Webhook 設定(接收 Ava 事件回寫)。Account-level webhook settings (to receive Ava event callbacks).
🔊Voice Messages 群組 僅 system-admin
語音訊息管理。roles: [] → 僅 system-admin。Voice message management. roles: [] → system-admin only.
⚙️Settings /accounts/{aid}/settings Owner/Analyst/Trainer/AccountAdmin
帳號設定(帳號層級)。5 個 tab:Main / Call / Transfer / API / A2P,各 tab 所需角色不同。注意 Campaign 內另有自己的 Campaign Settings(見情境 B)。Account settings (account level). 5 tabs: Main / Call / Transfer / API / A2P, each gated to different roles. Note there's a separate Campaign Settings inside a campaign (Context B).
📵A2P(10DLC 簡訊合規)詳解 Account Settings → A2P P0
A2P(Application-to-Person)是美加電信商要求的簡訊發送方登記制度(業界稱 10DLC)。沒登記或登記未通過,長碼號碼發簡訊會被電信商標記為垃圾/詐騙並過濾,收件人根本收不到——即使 SW 的 Action 確實觸發、Ava 也確實呼叫了 Twilio 送出。這是「訊息明明有發、對方卻收不到」最常見卻最容易被忽略的原因,因為 SW/Ava 兩端的 log 和 Stats 都會顯示「已送出」,問題出在電信商那一層看不到。A2P (Application-to-Person) is a carrier-mandated sender registration scheme for US/Canada SMS (industry name: 10DLC). Without an approved registration, long-code SMS gets flagged as spam/fraud and filtered by carriers before it reaches the recipient — even though SW's Action fired and Ava did call Twilio to send. This is the most common yet most overlooked cause of "it sent but they never got it," because both SW and Ava logs/Stats will show "sent" — the block happens at the carrier layer, invisible to either system.
Draft → Pending → In Progress → Approved(或 Rejected);只有 Draft/Rejected 狀態能編輯重送。A2P Settings → Business Profile section → "Create Business Profile". An account can only have one Business Profile (the create button disables once one exists). Status flows Draft → Pending → In Progress → Approved (or Rejected); only Draft/Rejected can be edited and resubmitted.Friendly Name;Campaign Usage(用途分類,如 2FA、Marketing、Customer Care、Account Notification 等,每個附說明 tooltip);Description(40–4096 字,說明誰發、發給誰、為何發);Message Flow(40–2048 字,說明收件人如何 opt-in 同意收訊息);Has Embedded Links / Has Embedded Phone(訊息是否含連結/電話);Message Sample ×2~5(20–1024 字,樣本訊息須與上面的 Description/Usage 一致)。⚠️ 刪除這個 Campaign 會連動刪除電信商那邊真正的 10DLC 申請,官方建議只在申請被拒或卡住時才刪。A2P Settings → A2P Campaigns section → "Create A2P Campaign", enabled only once the Brand is Approved (a tooltip explains this on the disabled button). Fields: Friendly Name; Campaign Usage (e.g. 2FA, Marketing, Customer Care, Account Notification — each with an explanatory tooltip); Description (40–4096 chars: who's sending, to whom, and why); Message Flow (40–2048 chars: how the recipient opted in); Has Embedded Links / Has Embedded Phone; 2–5 Message Samples (20–1024 chars, must align with the Description/Usage above). ⚠️ Deleting this Campaign also deletes the real 10DLC application at the carrier — only recommended when the application is rejected or stuck.四層依序卡關:Business Profile → Trust Bundle → Brand → A2P Campaign,每一層都要前一層通過(非 Draft)才能開始下一層,任何一層卡在 Pending/In Progress 都會讓後面全部卡住。狀態不是即時的,審核由電信商端進行,可能要數天。練習用 stg 帳號通常不需要真的走完 A2P(測試門號、低流量),但要對客戶或 prod 帳號送真實簡訊,務必提前確認 A2P 全部 Approved,不要等到「訊息送不出去」才回頭查。
另外要留意 Inherit Existed Twilio Account:若這個 Ava Account 是沿用別的帳號的 Twilio(從 0 開始 Phase 1「建立新的 Ava Account」步驟提過的選項),A2P 頁面上方會顯示「Inherit Twilio Account」,代表 A2P 資格跟著被沿用的帳號走,不用也不能在這個帳號重新申請。Four sequential gates: Business Profile → Trust Bundle → Brand → A2P Campaign — each requires the previous one Approved (past Draft) before it can start, and any layer stuck at Pending/In Progress blocks everything after it. Status isn't instant; carriers review it and it can take days. A stg practice account usually doesn't need to fully complete A2P (test numbers, low volume), but before sending real SMS to customers or on a prod account, confirm A2P is fully Approved ahead of time — don't wait until messages stop arriving to check.
Also watch for Inherit Existed Twilio Account: if this Ava Account reuses another account's Twilio (the option mentioned in Track A's Phase 1 "Create a new Ava Account" step), the A2P page shows "Inherit Twilio Account" at the top — meaning A2P eligibility follows the inherited account and can't (and needn't) be re-applied for on this one.
各環境新建 Account 時,A2P 要 Inherit 哪個帳號Which account to inherit A2P from, per environment
練習或新建 Account 時,不要自己重新跑一遍 A2P 申請——直接在 Create New Account 的 Inherit Existed Twilio Account 選下面對應環境的既有帳號,沿用它已經 Approved 的 A2P 資格。When creating a new Account for practice or real use, don't re-run the A2P application yourself — in Create New Account, set Inherit Existed Twilio Account to the existing account below for that environment, reusing its already-Approved A2P eligibility.
| 環境Env | 要 Inherit 的帳號Account to inherit |
|---|---|
| stg | AfforHousing - test (ID: 1) |
| prod | y_Back Up Bots - Jimmy Test (ID: 75) |
| cl1 | x_Jimmy Test (ID: 155) |
👤Admin 群組 僅 system-admin
系統管理群組,roles: [] 僅 system-admin。在帳號層級選單尾端自動接上;沒選任何 Account 時則單獨顯示(情境 C)。System administration group, roles: [] → system-admin only. Appended to the account-level menu; shown alone when no Account is selected (Context C).
情境 B · Campaign 內選單(從 Cascader 選了某 Campaign,或從 Campaigns 頁進入)Context B · In-campaign menu (a Campaign is selected via the Cascader, or by entering from Campaigns)
來源:CampaignsMenuItems(activeCampaignId)。路由前綴 /campaigns/{cid}/…。子項少於 2 個的群組會被「攤平」成頂層項目(shouldFlattenChildrenWhen)。Source: CampaignsMenuItems(activeCampaignId). Routes prefixed /campaigns/{cid}/…. Groups with fewer than 2 children are flattened into a top-level item (shouldFlattenChildrenWhen).
🏠Dashboard / Owner/Analyst/Trainer/AccountAdmin
Campaign 的 Dashboard 落地頁。The campaign's Dashboard landing page.
💬Conversations 群組
該 Campaign 的對話。所有角色可見。子項只有 1 個以上時保持群組;Tags 限 Owner/AccountAdmin。This campaign's conversations. All roles. Stays a group when it has more than one child; Tags is Owner/AccountAdmin only.
🤖AI 群組 Owner/AccountAdmin
Campaign 的 AI / Intent 設定。The campaign's AI / intent settings.
🌐Web Chat 群組 Owner/Analyst/Trainer/AccountAdmin
網頁聊天 widget 設定。Web chat widget settings.
🔗Custom Posts 群組 Owner/Analyst/Trainer/AccountAdmin
自訂 Webhook / 貼文整合。子項目前只有 List 一項。Custom webhook / post integrations. Currently only a List child.
📈Stats 群組
Campaign 層級的統計報表。Campaign-level statistics.
⚙️Settings /campaigns/{cid}/settings Owner/AccountAdmin
Campaign 專屬設定(有別於帳號層級的 Account Settings)。頁面是 5 個 tab:Conversation / Call / Transfer / SMS / Bot。下面依新人該設的優先度排列,不是 tab 上的順序。優先度標記:P0 不設動不起來 P1 Call/轉接才需要 P2 調優後補。從 0 開始的路線 A第一次跑至少把 P0 設好,Phase 3 才看得到行為。Campaign-specific settings (distinct from account-level Account Settings). The page has 5 tabs: Conversation / Call / Transfer / SMS / Bot. Below they're ordered by priority for a newcomer, not by tab order. Priority markers: P0 must set P1 for calls/transfer P2 refine later. For a first run of Track A, set at least the P0 items so Phase 3 shows behavior.
/accounts/{aid}/bots 让你先建。Attach one of the account's Bots to this campaign (the default Bot is marked). No Bot attached → Ava won't auto-reply; Conversations only shows the first message SW sent (one-way), and Phase 3 won't show Ava's auto-answer behavior. With no Bots at all, the page links to /accounts/{aid}/bots to create one first.conversation_channel(對話頻道,須與 SW Asset 的 Interaction Type 對應)、redirect_domain、fb_page_id。Poke Rules(催促未回覆 lead):enable_conversation_poke_mechanism、poke_prefix、poke_response / custom_poke_response、enable_after_x_messages(幾則後 poke)、lead_did_not_reply_after_x_hours(X 小時未回就 poke)、pokes_adhere_to_holiday、do_not_poke_if_*(已排程來電/已通話/前次未回/opt-out 等排除)。Poke 屬後續跟進行為,首則訊息不依賴它。Notion:Conversation Settings。Main Settings: conversation_channel (must match the SW Asset's Interaction Type), redirect_domain, fb_page_id. Poke Rules (nudge leads who didn't reply): enable_conversation_poke_mechanism, poke_prefix, poke_response / custom_poke_response, enable_after_x_messages, lead_did_not_reply_after_x_hours, pokes_adhere_to_holiday, do_not_poke_if_* (exclude when call scheduled / call already happened / previous poke unanswered / on opt-out). Poke is follow-up behavior; the first message doesn't depend on it. Notion: Conversation Settings.transfer_mode(Direct Transfer 直轉 / IVR Mode 語音選單 / SVR Mode 串流語音)、target_transfer_phone_number(轉接號碼)、transfer_hours_start/end(轉接時段)、transfer_message、Key Press Actions(None / Transfer / Transition to Campaign / Add to Opt Out List)、Greeting Messages(語音問候)。沒設轉接號碼/時段 → 轉接會失敗。Only needed for Call-type Assets or when a lead asks to be transferred. transfer_mode (Direct Transfer / IVR Mode / SVR Mode), target_transfer_phone_number, transfer_hours_start/end, transfer_message, Key Press Actions (None / Transfer / Transition to Campaign / Add to Opt Out List), Greeting Messages. No number/time window set and transfers fail.appointment_reminder_sms_content(預約提醒簡訊內容)、appointment_IVR_message_recording_file(提醒錄音檔)。Short Code:勾選該 campaign 要用組織裡的哪個短碼。只在預約提醒流程 / 短碼路由場景才用,第一次跑可先不管。Appointment Reminder: appointment_reminder_sms_content, appointment_IVR_message_recording_file. Short Code: toggle which of the organization's short codes this campaign uses. Only for appointment-reminder flows / short-code routing; can be ignored on a first run.answer_machine_detection_status(答錄機偵測 On/Off)等通話行為設定。屬通話品質調優,第一次跑可後補。answer_machine_detection_status (Answering Machine Detection On/Off) and other call-behavior settings. Call-quality refinement; can be added later.層級繼承 gotcha:campaign 級設定覆蓋 account 級;campaign 級留空就套 account 預設(Transfer 的 transfer_mode 原始碼 extra 明寫:「campaign 級沒設就預設套 account 級 call method」)。新人最常見的困惑:改了 account 級卻被 campaign 級覆蓋、或以為 campaign 會自訂結果其實套了 account 預設——設定時分清楚現在改的是哪一層。Inheritance gotcha: campaign-level settings override account-level; an empty campaign-level setting falls back to the account default (the Transfer transfer_mode code extra states: "If none is set at the campaign level, the account-level call method settings are used by default"). The common newcomer trap: changing the account level only to be overridden by the campaign level, or expecting a campaign-specific value that's actually inheriting the account default — always check which level you're editing.
情境 C · 未選 Account(只剩 Admin 群組)Context C · No Account selected (Admin group only)
來源:AdminMenuItems() 單獨渲染。內容同上面「Admin 群組」的 9 個子項(Contexts / Organizations / Accounts / Users / Internal Performance Stats / Intent Knowledge Base / Holiday Settings / API Keys / Short Codes),全部 僅 system-admin。一般使用者通常不會停在這個情境——登入後會自動帶入帳號層級選單。Source: AdminMenuItems() rendered alone. Same 9 children as the Admin group above (Contexts / Organizations / Accounts / Users / Internal Performance Stats / Intent Knowledge Base / Holiday Settings / API Keys / Short Codes), all system-admin only. Normal users rarely land here — login normally drops them into the account-level menu.
🔗④ Chromeless Embed Mode + SSO 深連結(供 SW Manager 內嵌使用)④ Chromeless embed mode + SSO deep link (used by SW Manager's embed)
這不是使用者自己會點進去的一頁,而是被 SW Manager 的「Unified Activity」入口內嵌的底層機制(見 SW 登入後導覽 → Unified Activity)。CEO 直接提出的需求「用同一個 SSO 身分,從 CL Manager 直達 CL Messenger 對話紀錄」,已在 CL1 驗證通過,且經過至少一輪安全性修補,新人若要 debug Unified Activity 顯示異常,要懂這一段。This isn't a page a user browses to directly — it's the underlying mechanism embedded by SW Manager's "Unified Activity" entry (see SW post-login tour → Unified Activity). It delivers a CEO-driven requirement — "reach CL Messenger conversation history directly from CL Manager under the same SSO identity" — already verified on CL1 and hardened by at least one security fix. New hires debugging odd Unified Activity behavior need to understand this.
?embed=1 模式,只渲染 Conversations 主體(Filters、對話列表、訊息串+composer、Journey State),不含 Ava 自己的頂列與側欄;搭配 CSP frame-ancestors 允許 Manager 網域框入。曾出現「偶發退回完整 chrome」的間歇性 bug,根因是頁面首次 client render 時 router.query 為空、與 redux-persist rehydration 競速,已改為 fallback 讀 window.location.search 修復。Ava exposes a ?embed=1 mode that renders only the Conversations body (Filters, conversation list, message thread + composer, Journey State) — no Ava top bar or sidebar — paired with a CSP frame-ancestors allowing the Manager domain to frame it. An intermittent "falls back to full chrome" bug was traced to router.query being empty on first client render, racing redux-persist rehydration; fixed by falling back to window.location.search.X-Frame-Options 擋下,已改用 popup 流程處理,並修掉 popup 被瀏覽器擋掉/使用者中途關閉時卡住 spinner 的死路。Clicking "Open CL Messenger" from Manager or opening a deep link directly, when Ava isn't logged in yet, silently completes SSO and lands on the correct account's conversation page (not a fallback to account 1). Clicking SSO login inside the iframe used to be blocked by X-Frame-Options; it's now routed through a popup flow, with fixes for the popup being blocked by the browser or closed mid-flow leaving the UI stuck on a spinner.Ava 的 Auth 三頁(登入 / 註冊 / 忘記密碼)的逐鍵詳解在下一章 Ava Messenger 頁面。SW Manager 那邊的登入後導覽在 登入後導覽。Per-button detail for Ava's three Auth pages is in the next chapter Ava Messenger pages. The SW Manager post-login tour is at Post-login tour.
頁面功能Pages
Ava Messenger 各頁面功能Ava Messenger page functions
Ava Messenger(ava-client)是營運人員看對話、通話、Bot 的地方。SW 負責「對誰做什麼」,Ava 負責「實際講話的過程」。Ava Messenger (ava-client) is where ops staff view conversations, calls, and bots. SW handles "to whom, what"; Ava handles "the actual talking."
Auth(登入/註冊/忘記密碼)逐鍵詳解Auth (signin / signup / forgot) — per-button detail
ant-cascader)選 account_id,可選多個帳號逐一驗證。Ava uses a hierarchical dropdown (ant-cascader) to pick an account_id; you can select multiple accounts to verify one by one..lniLtN、outbound(Ava 發).gtrpLg。可篩 All / 含 https:// 的對話,驗證 Ava 發的連結是否有效。每筆對話可直接操作三層級 opt-out(見 Overview → Opt-out 層級對應)。這一頁也有 ?embed=1 chromeless 模式,供 SW Manager 的 Unified Activity 內嵌(見 Embed Mode + SSO 深連結)。View each account's conversations. inbound (from the contact) .lniLtN, outbound (from Ava) .gtrpLg. Filter by All / conversations containing https:// to verify Ava-sent links are valid. Each conversation can trigger a three-level opt-out directly (see Overview → Opt-out levels mapping). This page also has a chromeless ?embed=1 mode used by SW Manager's Unified Activity embed (see Embed Mode + SSO deep link).Transfer Call 雙層設定。Transfer Call has two layers.轉接電話設定分 Account 層(account_transfer_settings)與 Campaign 層(campaign_transfer_settings),Campaign 可覆蓋 Account 預設。查詢端點 GET /api/accounts/{id}/transfer-call-method。 Transfer-call settings are split into an Account layer (account_transfer_settings) and a Campaign layer (campaign_transfer_settings); Campaign can override the Account default. Query endpoint GET /api/accounts/{id}/transfer-call-method.
從 0 開始 · 路線 AFrom scratch · Track A
從 Ava 建帳號到 SW Segment 設定完成From an Ava account to a complete SW Segment
這條路線是一條跨系統的完整流程:先在 Ava Messenger 建立一個新的 Account,再到 SW Manager 用它的 Account ID 接上、匯入名單、把 Segment 設到好。全程以 stg 環境為例,不碰任何程式碼。This track is a complete cross-system flow: first create a new Account in Ava Messenger, then use its Account ID in SW Manager to connect, import a list, and finish setting up a Segment. Everything uses stg as the example — no code involved.
整條流程的「橋」是 Ava Account ID(填進 SW App Integration 的 Account ID 欄位;stg 環境還要記得勾 Sandbox)。Ava 端建帳號時產生,SW 端 App Integration 消費。所以必須先做 Ava、再做 SW,順序不能反。The "bridge" of the whole flow is the Ava Account ID (goes into SW App Integration's Account ID field; remember to check Sandbox in stg). It's generated when you create the Ava account and consumed by SW's App Integration. So you must do Ava first, then SW — the order can't be reversed.
建立影片參考:Zight 錄影 — Ava 建立新 Account 全程Reference recording: Zight recording — creating a new Ava Account, start to finish
Phase 1 · Ava 端 — 建立帳號、Bot、CampaignPhase 1 · Ava side — create the Account, Bot, and Campaign
-
取得 Ava 登入帳號(signup 目前是 stub)Get an Ava login account (signup is currently a stub)
⚠️ 注意:
/auth/signup頁面目前是 stub——填 Nickname/Email/Password 送出後只會跳「Account created. Please check your inbox!」提示,不會呼叫任何 API、不寄確認信、也不會真的建帳號。所以登入帳號請改由已存在的 system-admin 建立再提供給你。stg 環境大多數 user 拿到的都是 system-admin 權限,可直接用來跑後續流程。這一步建立的是「登入使用者」,還不是業務 Account(業務 Account 在下面「建立新的 Ava Account」步驟建)。⚠️ Note: the/auth/signuppage is currently a stub — submitting Nickname/Email/Password only shows "Account created. Please check your inbox!" but calls no API, sends no confirmation email, and does not actually create an account. So have an existing system-admin create your login user and hand it to you. In stg most users are given system-admin rights, which is enough to run the rest of this flow. This step is about the "login user," not the business Account (that's the "Create a new Ava Account" step below). -
登入 Ava MessengerSign in to Ava Messenger
確認信完成後到
/auth/signin用 Email + Password 登入,進入 Ava 主畫面。stg / cl1 / prod 是三套獨立的 Ava,帳號不互通。Once confirmed, go to/auth/signinand sign in with Email + Password to reach the Ava main screen. stg / cl1 / prod are three separate Ava deployments — accounts don't carry over. -
建立新的 Ava AccountCreate a new Ava Account
從 admin 進入 Account 列表(
/accounts)後,點右上角 Create 建立新 Account。必填:Name(帳號名)、Transfer Phone Number(轉接號碼,預設走 Dial Transfer,之後可在 Settings 改 Streaming Transfer)、Organization(所屬組織,下拉選)。From admin, go to the Account list (/accounts) and click Create at the top right to make a new Account. Required: Name, Transfer Phone Number (defaults to Dial Transfer; switch to Streaming Transfer later in Settings), Organization (dropdown).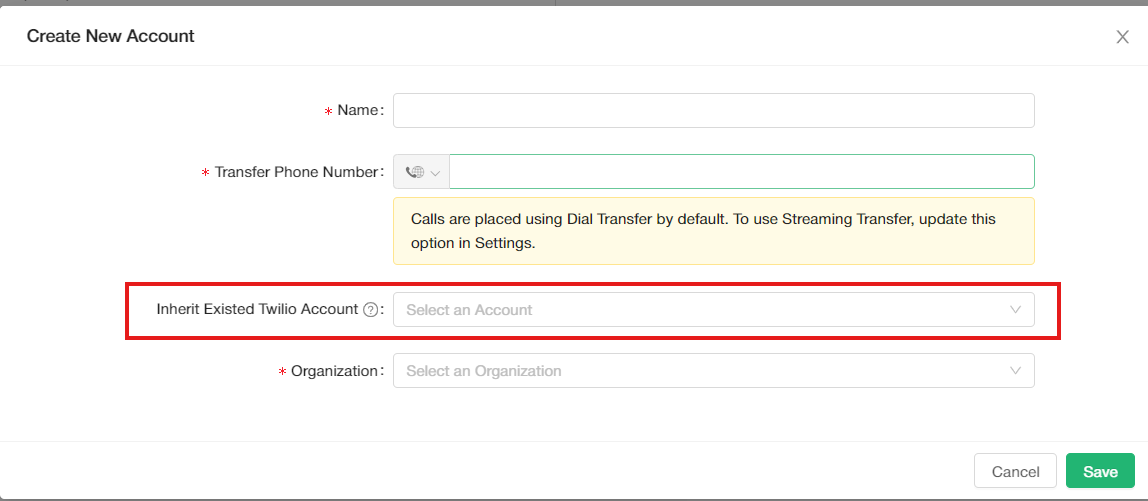 img/AVA1.png
Create New Account 表單Create New Account form ⚠️
Inherit Existed Twilio Account欄位請務必依照A2P 詳解裡「各環境要 Inherit 哪個帳號」的對照表填(stg / prod / cl1 各不同)——若這裡沒設定,新 Account 會沒有 A2P 資格,之後無法發送任何 SMS 或撥打電話。
🔒 權限:/accounts屬於 Admin 群組(roles: []= 僅 system-admin),Cascader 的「Create New Account」也需要ACCOUNT_CREATE權限——所以這一步必須用 system-admin 帳號。stg 環境大多數 user 都是 system-admin,可直接做;若你不是,請找 system-admin 協助建 Account。
建立完成後刷新頁面,再進入剛建立的 Account 做接下來的設定。💡 小提示:在 Account 列表找剛建立的那筆,可以點 ID 欄排序,最新建立的會排到最上面(或最下面,依排序方向)。⚠️ SetInherit Existed Twilio Accountexactly per the "which account to inherit, per environment" table in the A2P detail section (different for stg / prod / cl1) — without it, the new Account has no A2P eligibility and can't send any SMS or make calls afterward.
🔒 Permissions:/accountsis in the Admin group (roles: []= system-admin only) and the Cascader's "Create New Account" also needs theACCOUNT_CREATEpermission — so this step requires a system-admin account. In stg most users are system-admin and can do it directly; otherwise ask a system-admin to create the Account for you.
After creating it, refresh the page, then enter the new Account to continue. 💡 Tip: in the Account list, sort by the ID column to bring the newest one to the top (or bottom, depending on sort direction). -
建立 Bot(Campaign 的必要前提)Create a Bot (a prerequisite for the Campaign)
⚠️ 要先建立 Bot,否則無法建立 Campaign。一樣點右上角 Create 建立新 Bot(
/accounts/{accountId}/bots/create)。⚠️ A Bot must exist before you can create a Campaign. Click Create at the top right again to make a new Bot (/accounts/{accountId}/bots/create).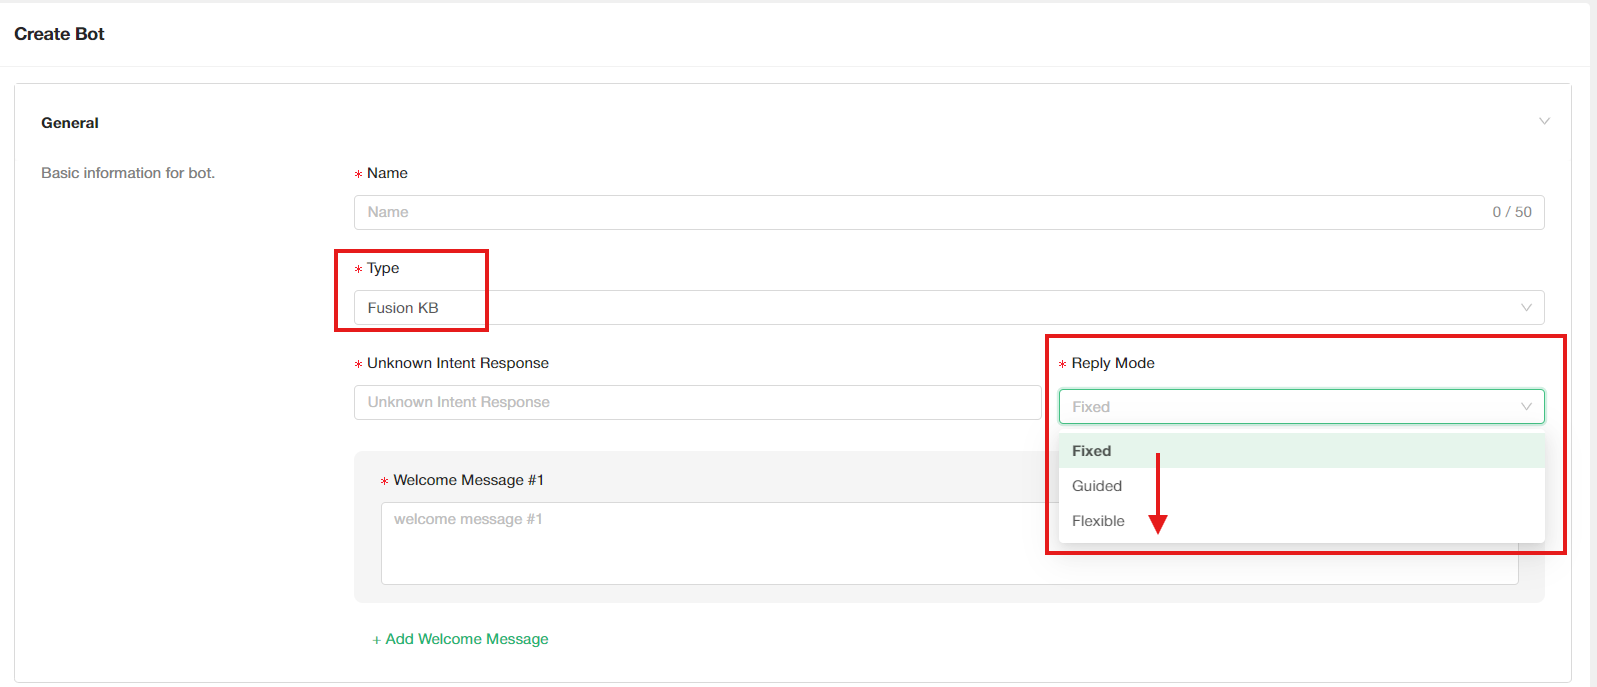 img/AVA2.png
Create Bot 表單Create Bot form Name:Bot 名稱。Name: the Bot's name.
Type 選 Fusion KB(另一個選項 DialogFlow 需要 user 先跟 Google 連通帳號,暫時不用管)。Type — pick Fusion KB (the other option, DialogFlow, needs the user's Google account linked first — skip it for now).
Welcome Message——這則訊息只有在 Ava → Bots → Chat Simulator 測試時會出現,平常用實體號碼測試不會看到它,屬正常現象,不是沒設定成功。表單現在支援用「+ Add Welcome Message」新增多筆訊息(
Form.List),不再只有單一欄位。Welcome Message — this only ever shows up in Ava → Bots → Chat Simulator; testing with a real phone number won't show it, which is expected, not a misconfiguration. The form now supports adding multiple messages via "+ Add Welcome Message" (aForm.List), not just a single field.Reply Mode 由上到下是 Fixed(死板)→ Guided → Flexible(靈活)。⚠️ 這其實是兩層設定:General 區塊裡「Unknown Intent Response」搭配的 Reply Mode 只管 AI 聽不懂時怎麼回;獨立的「Reply Mode」collapse 區塊才是這裡講的整體 Reply Mode。兩者都可能在 Campaign 層或 Account 層被覆蓋,優先序是 Campaign Intent Level > Account Intent Level > Bot Level——在這裡設的只是最底層的預設值。Reply Mode ranges from Fixed (rigid) → Guided → Flexible. ⚠️ This is actually two separate settings: the Reply Mode paired with "Unknown Intent Response" in the General block only controls what happens when the AI doesn't understand; the standalone "Reply Mode" collapse section is the overall Reply Mode being described here. Both can be overridden at the Campaign or Account level, with priority Campaign Intent Level > Account Intent Level > Bot Level — what you set here is just the bottom-level default.
Intent Group 一開始可以先選前面有
-前綴的四個(用 Transfer 元件從 Available 移到 My Intent Groups),之後有需求再自行新增。Intent Group — for a first setup, pick the four groups prefixed with-(move them from Available to My Intent Groups via the Transfer widget), and add more later as needed. -
建立 CampaignCreate the Campaign
Bot 建好後,一樣點右上角 Create 建立新 Campaign。精靈只需要填 Name,其他步驟(Default Language、Default Timezone、後續的 IVR/Conversation 設定)都有預設值,一路按 Continue 到底即可——這些之後都能回 Campaign Settings 再調整。Once the Bot exists, click Create at the top right again for the Campaign. The wizard only needs a Name — the other steps (Default Language, Default Timezone, and the IVR/Conversation setup that follows) all have defaults, so just click Continue through them. Everything can be revisited later in Campaign Settings.
-
確認 Account ID 與 Campaign ID 都已記錄Confirm the Account ID and Campaign ID are both recorded
以上是 Ava 建立新 Account 的完整步驟。收尾前務必確認沒有遺漏:Account ID(Account 列表
Name (ID: nn))和 Campaign ID(Campaign 列表同樣格式)都要存在、記錄下來——接下來 SW 那邊(Phase 2)的 Asset / Integration 都會用到。That covers the full Ava new-Account setup. Before moving on, confirm nothing was missed: both the Account ID (Account list showsName (ID: nn)) and the Campaign ID (same format in the Campaign list) exist and are recorded — Phase 2 on the SW side (Asset / Integration) will need them.
Phase 2 · SW 端 — 建 Account、接上 Ava、完成 SegmentPhase 2 · SW side — create the Account, connect Ava, complete the Segment
建立影片參考:Zight 錄影 — SW 建立新 Account 到觸發 SegmentReference recording: Zight recording — SW from a new Account to triggering the Segment
-
登入 SW Manager 並建立新 AccountSign in to SW Manager and create a new Account
開
https://staging.sw.onramplab.com/auth/signin,輸入 SW 的 Email + 密碼登入(看到 "home" 字樣即成功)。從 settings/admin 進入 Accounts 列表,點右上角 Create 建立新 Account。Openhttps://staging.sw.onramplab.com/auth/signin, sign in with the SW Email + password (you'll see "home" when it works). From settings/admin, go to the Accounts list and click Create at the top right to make a new Account.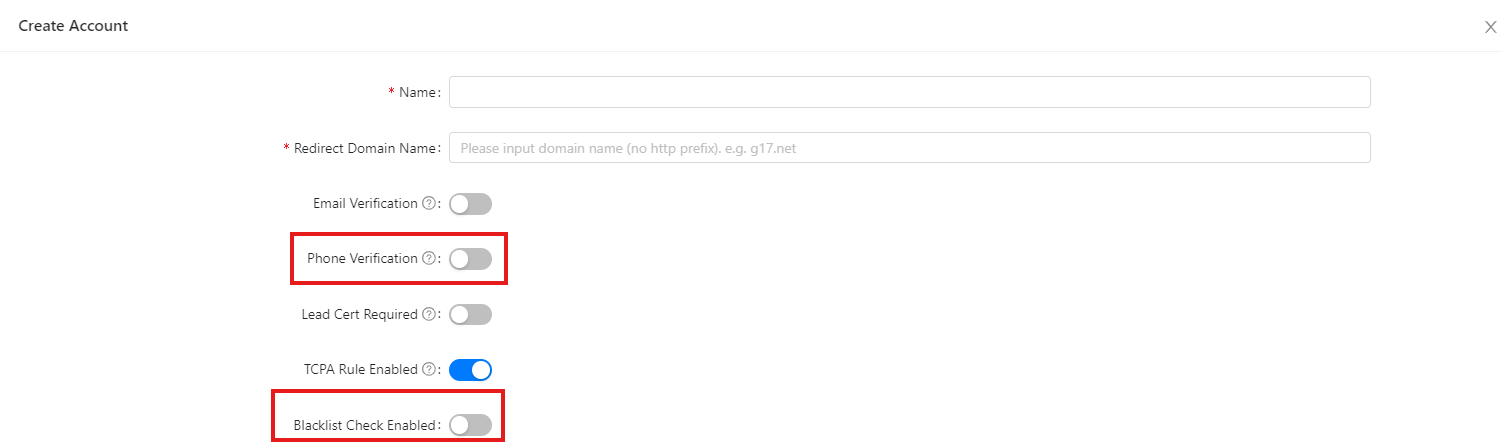 img/SW1.png
Create Account 表單Create Account form 表單裡兩個欄位要特別注意:
⚠️ Phone Verification 開啟的話,非美國的正式號碼會被阻擋並加入黑名單——如果客戶名單有海外門號,先確認這個開關的影響。
⚠️ Blacklist Check Enabled 開啟的話,匯入時會檢查號碼是否在一些已知黑名單裡。
💡 Redirect Domain 先跟著外面其他 Account 填一樣的值就好,不用自己另外想。Two fields in the form need attention:
⚠️ Phone Verification, if enabled, will block and blacklist any non-US real number — check this if your contact list has overseas numbers.
⚠️ Blacklist Check Enabled, if enabled, checks numbers against known blacklists on import.
💡 For Redirect Domain, just match whatever value other existing Accounts use — no need to invent your own. -
把新 Account 加入 Organization,再把 Organization 指給你的 UserAdd the new Account to an Organization, then assign that Organization to your User
⚠️ 建立完 Account 後,即使刷新頁面,也沒辦法在帳號切換器上馬上看到剛建立的 Account——這不是壞掉,是因為新 Account 還沒被指派給任何人。要讓自己的 User 看得到它,需要兩步:
① 進 admin → Organization,把剛建的 Account 加入一個 Organization(attachAccounts,只能選還沒被任何 Organization 綁定的自由帳號)。
② 進 admin → Users,編輯你自己的 User,在 Organizations多選欄裡把該 Organization 加進去——User 會 inherit 這個 Organization 底下所有 Account(唯讀顯示在下方確認)。⚠️ After creating the Account, even refreshing the page won't make it show up in the account switcher right away — that's not a bug, it's because the new Account isn't assigned to anyone yet. To make it visible to your User, two steps:
① Go to admin → Organization, and add the new Account to an Organization (attachAccounts— only unassigned free accounts are selectable).
② Go to admin → Users, edit your own User, and add that Organization in the Organizations multi-select field — the User inherits every Account under that Organization (shown read-only below for confirmation).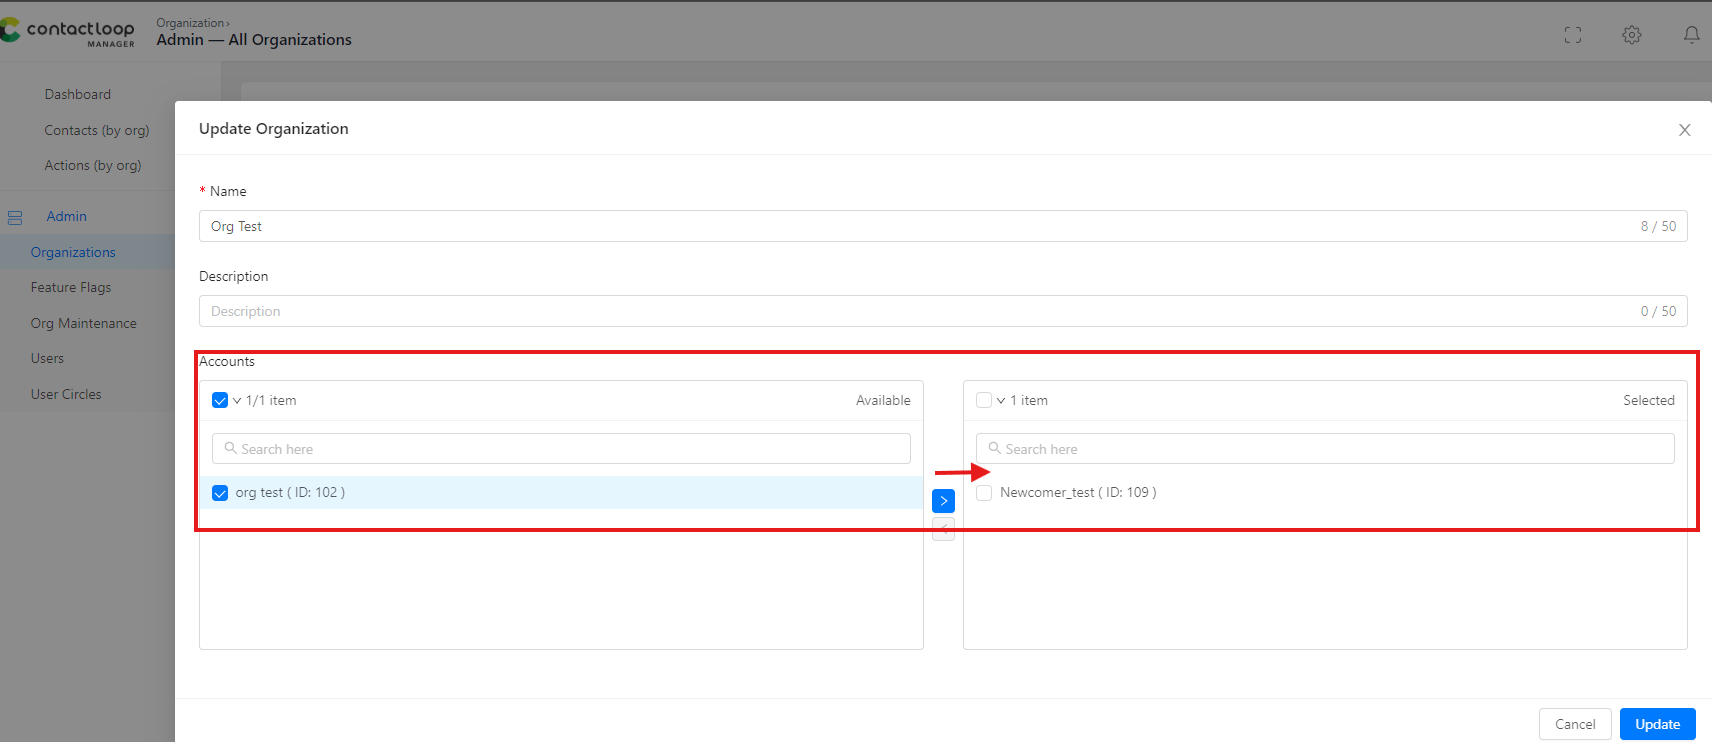 img/SW2.png
admin → Organization:Add Accountadmin → Organization: Add Account 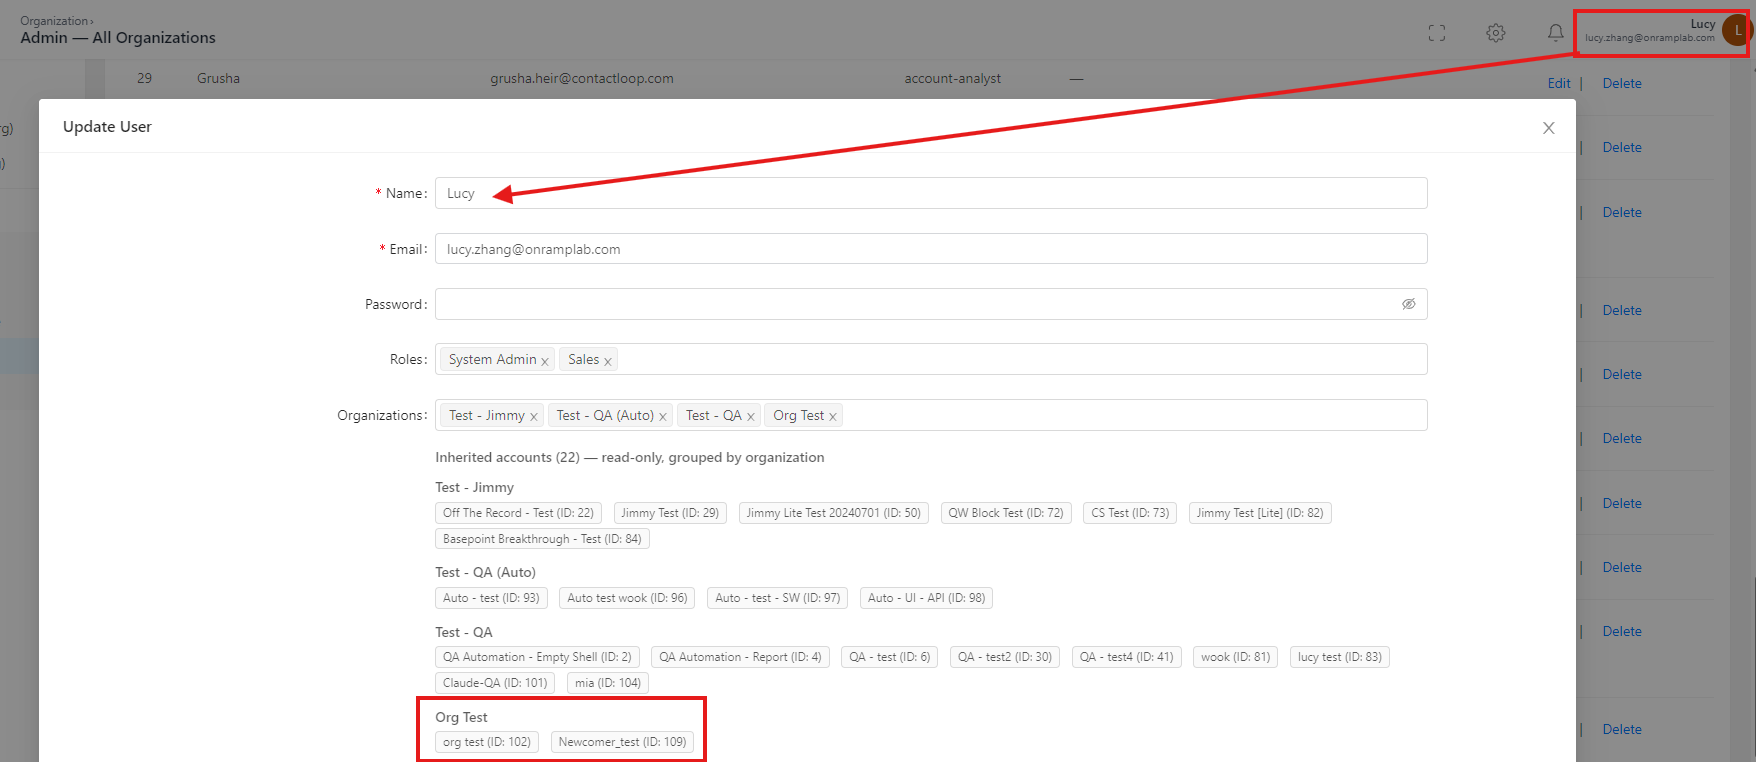 img/SW3.png
admin → Users:把 Organization 指給 Useradmin → Users: assign the Organization to the User -
切換到新 Account,建立 App Integration(接 Ava)Switch to the new Account and create an App Integration (connect Ava)
點左上角 logo 離開 admin 頁面,用帳號切換器切到剛新增的 Account。點 settings/admin 進入
/app-integrations,一樣點右上角 Create 建立新的 App Integration。Click the top-left logo to leave the admin pages, then use the account switcher to switch to the new Account. Go to settings/admin →/app-integrations, and click Create at the top right again.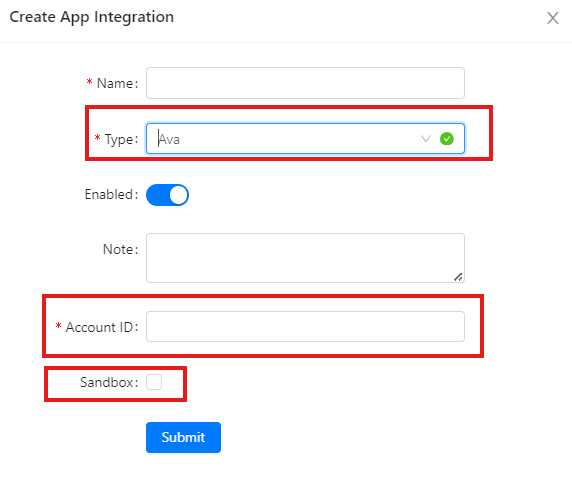 img/SW4.png
Create App Integration 表單Create App Integration form Type 選 Ava。這個表單只有兩個欄位:Account ID——這裡填的其實是 Phase 1 拿到的 Ava Account ID(目前實作把它存進後端叫
api_key的欄位,是暫時的技術債,不代表要另外填一組 API Key);Sandbox checkbox——在 stg 環境一定要勾選 Sandbox,才能連到 Ava。沒設這一步,後續 Action 呼叫 Ava 不會生效。Type = Ava. This form only has two fields: Account ID — you actually put the Ava Account ID from Phase 1 here (the backend currently stores it in a field literally calledapi_key, which is a temporary implementation detail, not a separate API Key you need to fill in); Sandbox checkbox — in stg you must check Sandbox to reach Ava. Skip this step and later Actions calling Ava won't work. -
到 Configuration 建立 AssetGo to Configuration and create an Asset
建好 App Integration 後,到左側選單的 Configuration 群組建立 Asset——⚠️ 每個 App Integration 有自己的子項目,要在剛建立的那個 App Integration 名稱底下建 Asset,別選錯了。一樣點右上角 Create。Once the App Integration exists, go to the Configuration group in the left sidebar to create an Asset — ⚠️ each App Integration has its own sub-items, so make sure you create the Asset under the App Integration you just made, not a different one. Click Create at the top right again.
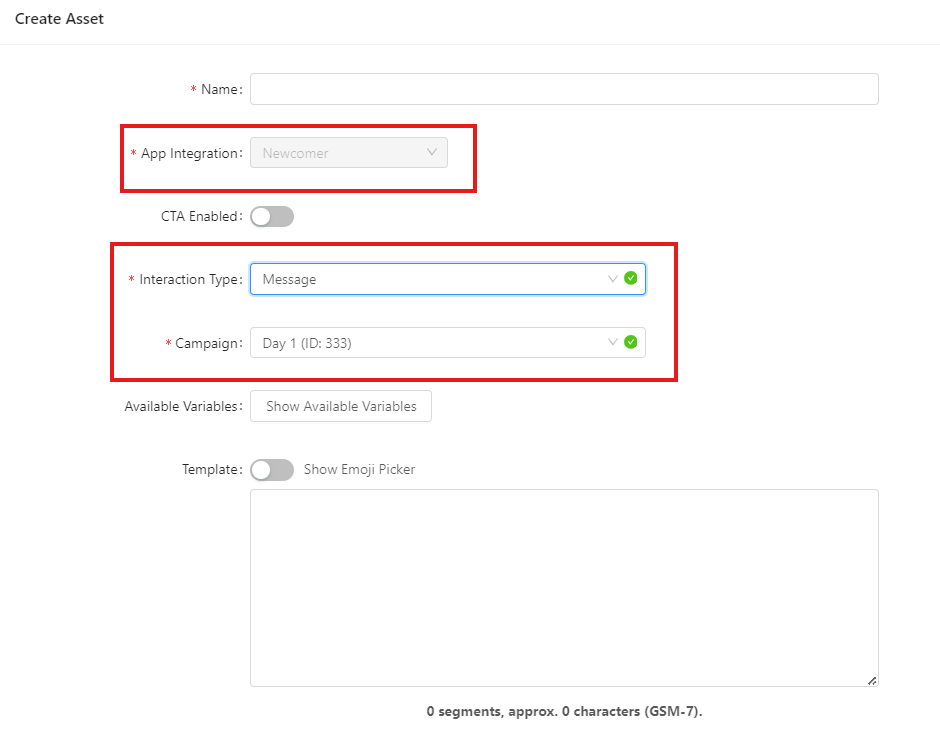 img/SW5.png
Create Asset 表單Create Asset form 先確認 App Integration 名稱是不是選對了那個 Ava 整合,再選 Interaction Type(目前 Ava 只有兩種:Message / Call)、選 Campaign。如果 Interaction Type 選 Message,需要填 Template 作為 Ava 要傳送的訊息內容;選 Call 則不用填。First confirm the App Integration name is the right Ava integration, then pick Interaction Type (currently only two for Ava: Message / Call) and pick a Campaign. If Interaction Type is Message, fill in a Template for what Ava will actually send; Call doesn't need one.
-
到 Configuration 建立 SegmentGo to Configuration and create a Segment
一樣在 Configuration 裡,點右上角 Create 建立新 Segment。Still under Configuration, click Create at the top right to make a new Segment.
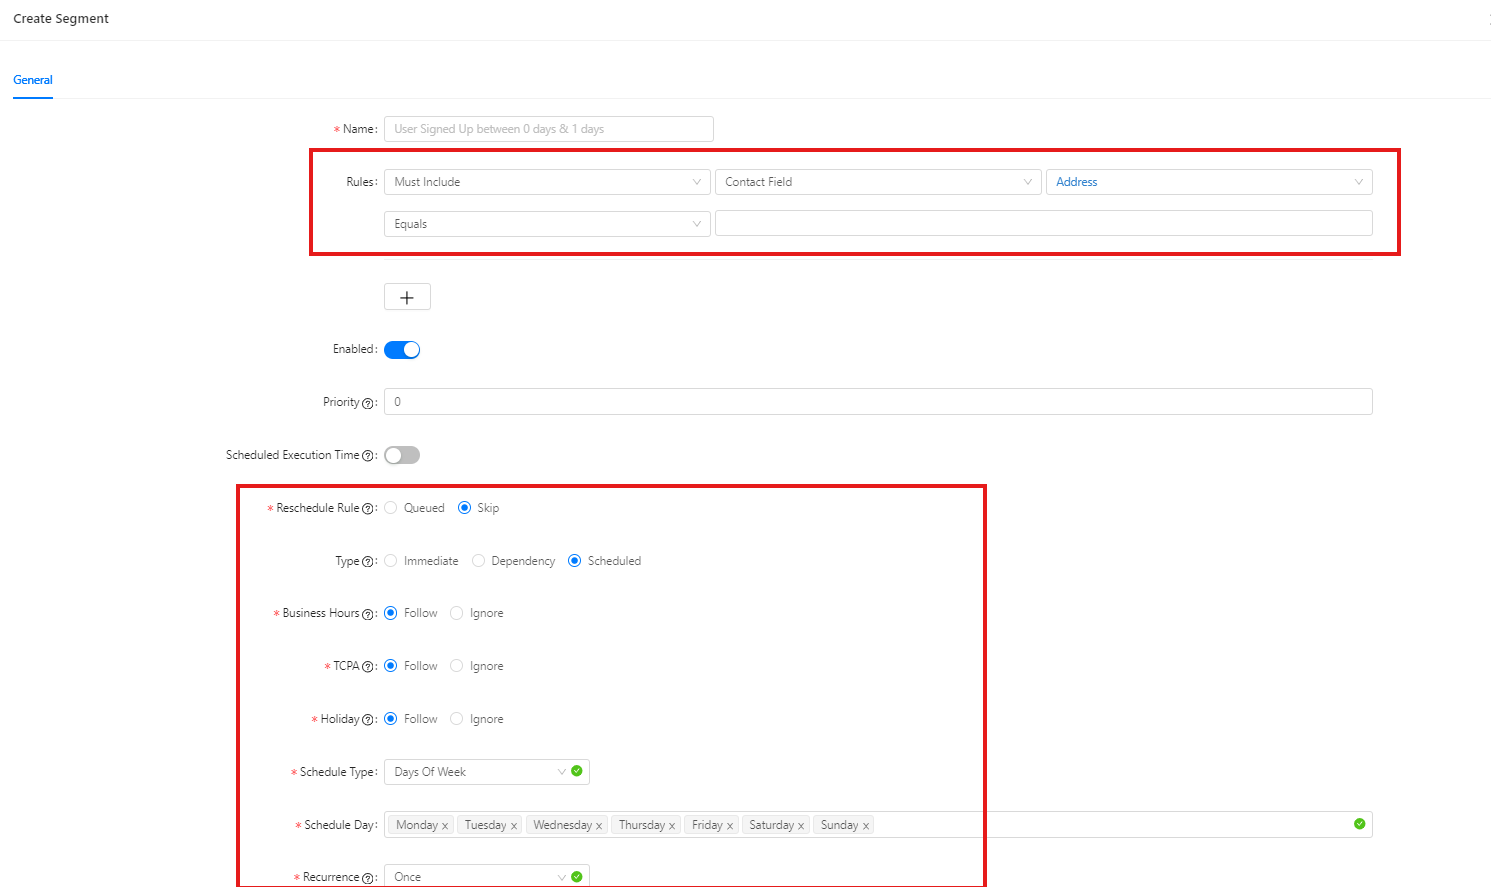 img/SW6.png
Create Segment 表單Create Segment form 表單上半部的 Rules(資料篩選)是觸發條件設定——決定哪些聯絡人算命中這個 Segment。下半部從 Reschedule Rule 開始一路到底的欄位(
Type、Business Hours、TCPA、Holiday等)是觸發時間設定——決定命中的聯絡人「什麼時候」被真正觸發。存檔後頁面會直接接著要求你設定 Action。The Rules section (data filtering) at the top of the form is the trigger-condition setup — it decides which contacts count as matching this Segment. Everything from Reschedule Rule onward (Type,Business Hours,TCPA,Holiday, etc.) is the trigger-timing setup — it decides when a matching contact actually gets triggered. Saving takes you straight into setting up the Action. -
設定 Action(選 Channel,可行內建立 Asset)Set up the Action (pick a Channel, optionally create the Asset inline)
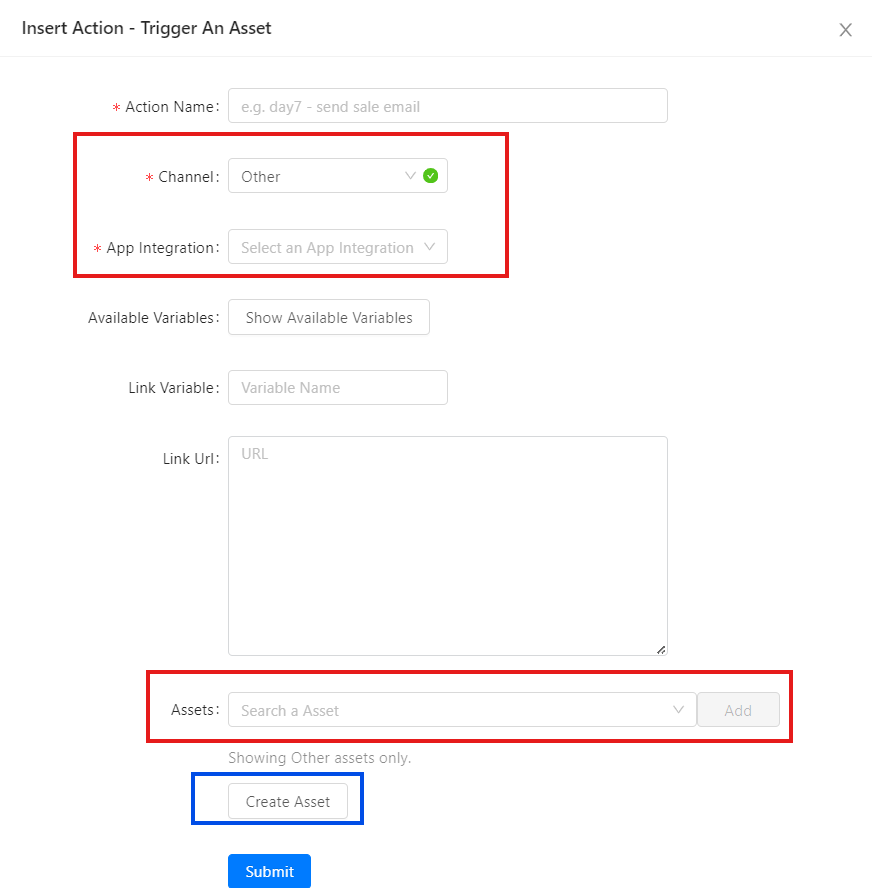 img/SW7.png
Action:Channel + Asset 選擇Action: Channel + Asset selection Channel 要跟剛剛建立的 Asset 對應:
· 若 Asset 是 Message → Channel 選 SMS。
· 若 Asset 是 Call → Channel 選 Active Dials。
· Other 是給非 Ava 在用的其他整合類型選的,這條路線用不到。
💡 如果前面沒有先建好 Asset,也可以在這個畫面直接建立:先選好 Channel 和要建在哪個 App Integration 底下,再點下面的 Create Asset 按鈕,彈出的表單就是完整的 Asset 建立流程。⚠️ 這個行內表單目前把 App Integration / Interaction Type 鎖成唯讀(顯示「Inherited from Action」),直接繼承 Action 已選的 Channel,不能在這裡改;要編輯這兩欄請改走 Configuration → Assets → Create 獨立路徑。
⚠️ 關鍵:在下拉選單裡選好要用的模板(Asset)後,一定要點旁邊的 Add 按鈕——不點 Add,選擇不會生效,Action 就等於沒接上任何 Asset。
💡 若這個帳號底下有不只一個 Ava App Integration,這裡要手動選要用哪一個;如果帳號完全沒有 Ava 整合,會看到提示「No Ava integration found for this account. Set one up under App Integrations to use SMS / Active Dials.」,回到上一步先建好。The Channel must match the Asset you just created:
· If the Asset is Message → pick SMS.
· If the Asset is Call → pick Active Dials.
· Other is for non-Ava integration types — not used on this track.
💡 If you didn't create an Asset beforehand, you can create it right here: pick the Channel and which App Integration it belongs to, then click the Create Asset button below — the modal that opens is the full Asset creation flow. ⚠️ This inline form currently locks App Integration / Interaction Type as read-only (shown as "Inherited from Action"), inheriting whatever Channel the Action already has selected — you can't change them here. To edit those two fields, use the standalone Configuration → Assets → Create path instead.
⚠️ Key rule: after picking the template (Asset) you want in the dropdown, you must click the Add button next to it — without clicking Add, the selection doesn't take effect and the Action ends up with no Asset attached at all.
💡 If this account has more than one Ava App Integration, you'll need to pick which one to use here; if it has none at all, you'll see "No Ava integration found for this account. Set one up under App Integrations to use SMS / Active Dials." — go back and create one first. -
匯入聯絡人(Contacts)Import contacts
Contacts 選單 → Import Contact(stg 新版會在新分頁開啟)。貼上 CSV,欄位:
phone, first_name, last_name, email, external_lead_id, traffic_source。匯入後,命中 Segment 規則的聯絡人會觸發「已指派給該 Segment 的 Action」,Action 再透過 App Integration 呼叫 Ava 發送(首則訊息 / 外呼)。⚠️ 若 Action 沒建或沒指派給 Segment,匯入只會把聯絡人寫入 SW,不會觸發任何訊息——這是「匯入了卻沒動」最常見的原因。Contacts menu → Import Contact (the stg new UI opens it in a new tab). Paste a CSV with fields:phone, first_name, last_name, email, external_lead_id, traffic_source. After import, a contact matching the Segment rule triggers the Action assigned to that Segment, and the Action calls Ava through the App Integration to send (first message / outbound call). ⚠️ If no Action is created or it isn't assigned to the Segment, the import only writes the contact to SW and triggers nothing — the most common cause of "imported but nothing happened." -
查看 Contacts-27 聯絡人資料Review contacts in Contacts-27
到
/contacts-27開啟聯絡人總覽(新版 ag-grid,進頁會打/api/contacts/grid,回應data.rows / data.lastRow)。在這裡確認剛匯入的聯絡人是否出現、用欄位排序與篩選查看 phone / first_name / last_name / email 等欄位。2026-08 起前端已改打 grid API,舊的size=500列表行為已不適用;若要對照舊版,可看/contacts(old,size=20)或/contacts-2026(old,size=500),新人日常請以 Contacts-27 為準。Go to/contacts-27to open the contact overview (new ag-grid; on load it calls/api/contacts/grid, returnsdata.rows / data.lastRow). Confirm your imported contacts appear, and sort/filter by phone / first_name / last_name / email. As of 2026-08 the frontend uses the grid API; the oldsize=500list behavior no longer applies. To compare with the old version, see/contacts(old,size=20) or/contacts-2026(old,size=500) — but day-to-day, use Contacts-27.
先在 stg 跑完整條,確認對話真的接起來再碰 prod。Run the whole flow in stg first and confirm the conversation actually connects before touching prod.prod 匯入真實名單會真的發 SMS / 打電話給客戶,且受 TCPA 限制與營業時間(Business Hours)管控,出錯無法回收。Ava Account 一旦建立會開出真實 Twilio 門號費用,練習請用 stg。 Importing a real list in prod actually sends SMS / calls customers, governed by TCPA restrictions and Business Hours, and mistakes can't be undone. Creating an Ava Account incurs real Twilio number charges, so practice in stg.
流程總覽(整條從頭到尾的一頁式總圖)Flow overview (the whole thing on one page)
Ava 登入帳號(由 system-admin 建立;signup 是 stub)→ Ava signin
   │
   ▼
Ava /accounts → Create New Account(Name + Transfer Phone + Organization)〔需 system-admin〕
   │  產生 Ava Account ID  ←── 整條流程的「橋」
   ▼
Ava 建 Bot(Campaign 必要前提)→ 建 Campaign
   │
   ▼
SW signin → 選 SW Account
   │
   ▼
SW /app-integrations → Type=Ava,Account ID 填 Ava Account ID,stg 勾選 Sandbox
   │
   ▼
SW /assets → 建 Asset(樣板 + 變數 + Ava Campaign = 發什麼)
   │
   ▼
SW /segments → 建 Segment(規則 = 對誰 + Trigger 何時)→「Next - Create Action」
   │
   ▼
SW 建 Action(Channel + App Integration + 選 Asset)→ 指派回 Segment(action_id)
   │
   ▼
SW Import Contacts(命中規則者 count +1 → 觸發【已指派給 Segment 的 Action】→ Ava 發訊息)
   │
   ▼
SW /contacts-27 → 查看聯絡人資料
   │
   ▼  Phase 3 · 回 Ava 確認訊息與行為執行
Ava Cascader 選 Account/Campaign → Conversations 看對話 + 首則訊息 + Bot 回話
   │
   ▼
Ava Stats(Call Performance / Conversion)→ 確認行為有執行 ✓ 完成Ava login user (created by a system-admin; signup is a stub) → Ava signin
   │
   ▼
Ava /accounts → Create New Account (Name + Transfer Phone + Organization) [system-admin only]
   │  generates the Ava Account ID  ←── the "bridge" of the whole flow
   ▼
Ava create a Bot (prerequisite for the Campaign) → create the Campaign
   │
   ▼
SW signin → pick a SW Account
   │
   ▼
SW /app-integrations → Type=Ava, Account ID = Ava Account ID, check Sandbox in stg
   │
   ▼
SW /assets → create an Asset (template + variables + Ava Campaign = what)
   │
   ▼
SW /segments → create a Segment (rule = to whom + trigger when) → "Next - Create Action"
   │
   ▼
SW create Action (Channel + App Integration + pick Asset) → assign back to Segment (action_id)
   │
   ▼
SW Import Contacts (matching ones count +1 → trigger the Action assigned to the Segment → Ava sends)
   │
   ▼
SW /contacts-27 → review the contacts
   │
   ▼  Phase 3 · back to Ava to confirm messages & behavior executed
Ava Cascader pick Account/Campaign → Conversations: see the thread + first message + Bot reply
   │
   ▼
Ava Stats (Call Performance / Conversion) → confirm behavior executed ✓ done
Phase 3 · 回 Ava 確認訊息與行為有執行Phase 3 · Back to Ava to confirm messages & behavior executed
前面 Phase 2 在 SW 做的事,最終都要回 Ava 這一端驗證真的發生了。這是整條流程的收尾,也是判斷「有沒有接起來」的依據。Everything Phase 2 set up on the SW side must finally be verified back on the Ava side. This closes the loop and is how you judge whether it "actually connected."
-
切回 Ava,選剛建的 Account / CampaignSwitch back to Ava and pick the Account / Campaign you just created
回到 Ava Messenger,用頂部 Cascader 選 Phase 1 建的 Account,再進入該 Account 下的 Campaign(SW 端 Asset 的
Campaign下拉選的就是這個)。選了會router.push('/')進 Campaign Dashboard,左側選單同時切換成「情境 B · Campaign 內選單」。Back in Ava Messenger, use the top Cascader to pick the Account from Phase 1, then enter a Campaign under it (the same one the SW Asset'sCampaigndropdown selected). Selecting does arouter.push('/')into the Campaign Dashboard, and the left sidebar switches to the "Context B · in-campaign" menu. -
到 Conversations 看對話是否出現Open Conversations and check the thread appears
左側 Conversations →
/campaigns/{cid}/conversations。確認剛匯入的聯絡人有出現一則對話,且SW 觸發的首則訊息(Asset 的 Template 內容)已送達。若這個 Campaign 的 Settings → Bot tab 有綁 Bot,會看到 Ava 自動回話——這就是「Ava 行為有執行」最直接的證據。若 Bot 沒綁,只會看到單向的首則訊息(沒有自動應答),此時行為算「訊息送達但未應答」;詳見 Campaign Settings 詳解。Left sidebar Conversations →/campaigns/{cid}/conversations. Confirm each imported contact shows a conversation thread and that the first message triggered by SW (the Asset's Template content) was delivered. If this Campaign's Settings → Bot tab has a Bot attached, you'll see Ava auto-reply — the most direct evidence that "Ava behavior executed." With no Bot attached you'll only see the one-way first message (no auto-reply); in that case the status is "message delivered, not answered." See Campaign Settings detail. -
到 Stats 確認行為有執行Open Stats to confirm behavior executed
左側 Stats 群組:Call Performance Stats(所有角色可見)看發送/通話數;Conversion Stats(Owner/AccountAdmin)看轉換。計數 > 0 代表 Action 確實被觸發並送到 Ava 執行。也可回帳號層 Stats 看 Campaign Performance 當整體對照。Left sidebar Stats group: Call Performance Stats (all roles) for send/call counts; Conversion Stats (Owner/AccountAdmin) for conversions. A count > 0 means the Action was actually triggered and executed on the Ava side. You can also check account-level Stats → Campaign Performance for an overall comparison.
-
通過標準(什麼算「接起來了」)Pass criteria (what counts as "connected")
同時滿足以下即算成功:
① Contacts-27 看得到匯入的聯絡人(資料有進 SW);
② Ava Conversations 看得到對話 + 首則訊息已送達(訊息有到 Ava);
③ Ava Stats 計數 > 0(Action 確實被觸發執行);
④ (若有綁 Bot)Conversations 看得到 Ava 自動回話(Bot 行為有執行)。Success means all of the following hold:
① Contacts-27 shows the imported contacts (data made it into SW);
② Ava Conversations shows the thread + the first message delivered (the message reached Ava);
③ Ava Stats count > 0 (the Action was actually triggered and executed);
④ (if a Bot is attached) Conversations shows Ava auto-replying (Bot behavior executed).
沒動?依這個順序排查:Nothing happened? Debug in this order:
1. Action 有沒有建、有沒有指派給 Segment——最常見原因(匯入了卻沒動多半是這)。
2. App Integration 的 Account ID 是否填對 Ava Account ID、Sandbox 是否有勾(stg 環境必勾)——填錯或沒勾 Sandbox,SW 查不到 Ava Campaign、Action 呼叫 Ava 也會失敗。
3. Asset 的 Campaign 下拉有沒有選到正確的 Ava Campaign。
4. Campaign Settings 的 P0 有沒有設——Bot 沒綁就沒有自動回話;Conversation Channel 不對訊息走錯路徑。
5. 門號有沒有綁、營業時段(Business Hours)/ TCPA / Holiday 是否 Follow——Follow 模式下遇到非營業時段會 Queued 到下次可用時段,看起來像「沒發」。
6. Segment Trigger 的 Enabled 有沒有開、Type/Schedule 設對沒。
7. 美加號碼:A2P(10DLC)有沒有 Approved——SW/Ava 兩端 log 都顯示「已送出」、Stats 計數也 > 0,但客戶就是收不到簡訊,十之八九是這個:電信商在看不見的那一層把訊息過濾掉了。
1. Was the Action created and assigned to the Segment? — the most common cause of "imported but nothing happened."
2. Is the App Integration's Account ID actually the Ava Account ID, and is Sandbox checked (required in stg)? — wrong value or missing Sandbox means SW can't list Ava Campaigns and Action calls to Ava fail.
3. Did the Asset's Campaign dropdown pick the right Ava Campaign?
4. Are the Campaign Settings P0 items set? — no Bot, no auto-reply; a wrong Conversation Channel sends messages down the wrong path.
5. Is a number bound, and are Business Hours / TCPA / Holiday set to Follow? — under Follow, off-hours sends are Queued to the next available slot and can look like "nothing sent."
6. Is the Segment Trigger Enabled, with the right Type/Schedule?
7. US/Canada numbers: is A2P (10DLC) Approved? — both SW and Ava logs show "sent" and Stats counts are > 0, yet the customer never got the text — nine times out of ten this is it: the carrier silently filtered it at a layer neither system can see.
從 0 開始 · 路線 BFrom scratch · Track B
QA 工程師:從 0 跑出第一套測試QA engineer: run your first test suite from scratch
auto_cl 是 ContactLoop 的 E2E 自動化測試專案(Python + Playwright),跑通它就等於把 SW ↔ Ava 整條迴圈驗過一遍。目標:在本機跑出 stg 的綠燈報告。auto_cl is ContactLoop's E2E automation test project (Python + Playwright); running it green verifies the whole SW ↔ Ava loop. Goal: produce an all-green stg report on your machine.
測試覆蓋哪些事What the tests cover
| 測試檔Test file | 驗什麼What it checks |
|---|---|
test_ip.py | 最先跑,確認當前 IP 環境Runs first; confirms the current IP environment |
test_sw_nucleus.py | SW 登入 → 選帳號 → 匯入聯絡人 → 驗證首則 SMS 送達(Quo)→ 模擬 lead 發 5 句 → 登入 Ava 比對訊息一致SW login → pick account → import contacts → verify first SMS delivered (Quo) → simulate the lead sending 5 lines → log in to Ava and assert messages match |
test_sw_page_api_checks.py | 逐頁導航 SW 各核心頁面,攔截真實 XHR,驗狀態碼與關鍵欄位Navigates each core SW page, intercepts real XHRs, asserts status codes and key fields |
test_sw_segments.py | 匯入前後 segment count 增量驗證Verifies the segment count delta before/after import |
test_ava_link.py | 最後跑,Ava 對話中 Ava 發的連結有效性驗證Runs last; verifies the validity of Ava-sent links inside Ava conversations |
安裝步驟Install steps
# 1. 建立虛擬環境並安裝套件
python -m venv venv
source venv/bin/activate          # Windows: venv\Scripts\activate
pip install -r requirements.txt

# 2. 安裝 Playwright 瀏覽器
playwright install chromium

# 3. 複製環境變數範本並填入
cp .env.example .env              # Windows: copy .env.example .env# 1. Create a venv and install deps
python -m venv venv
source venv/bin/activate          # Windows: venv\Scripts\activate
pip install -r requirements.txt

# 2. Install the Playwright browser
playwright install chromium

# 3. Copy the env template and fill it in
cp .env.example .env              # Windows: copy .env.example .env
.env 必填欄位(以 stg 為例)Required .env fields (stg example)
| 變數Variable | 說明Description | 必填?Required? |
|---|---|---|
STG_SW_EMAIL / PASSWORD | stg 的 SW Manager 帳密stg SW Manager credentials | ✅ |
STG_AVA_EMAIL / PASSWORD | stg 的 Ava Messenger 帳密stg Ava Messenger credentials | ✅ |
QUO_API_KEY | Quo SMS API 金鑰(測 SMS 驗證用)Quo SMS API key (for SMS verification) | 跑 Nucleus 才需要Only for Nucleus |
QUO_phoneNumberId | 測試 lead 號碼的 Quo 內部 IDQuo internal ID of the test lead number | 跑 Nucleus 才需要Only for Nucleus |
QUO_participants_stg | stg 對應的 SW 端號碼(E.164)The SW-side number for stg (E.164) | 跑 Nucleus 才需要Only for Nucleus |
SMTP_EMAIL / PASSWORD | 測試結果通知信(Gmail App Password)Result notification email (Gmail App Password) | 要收信才需要Only if you want email |
TEAMS_WEBHOOK_URL | Teams 通知 webhookTeams notification webhook | 要 Teams 通知才需要Only for Teams notifications |
R2_* | Cloudflare R2(影片/報告上傳)Cloudflare R2 (video/report upload) | 要上傳才需要Only if uploading |
跑測試Run the tests
# Windows 先設編碼
$env:PYTHONUTF8=1

# 全部測試(自動排序:IP → Nucleus → 頁面 API → Segments → AvaLink)
pytest --env stg -v

# 只跑某一支
pytest tests/test_sw_segments.py --env stg -v

# 只跑 Ava 相關 / 排除 SMS
pytest -m Ava --env stg -v
pytest tests/test_sw_nucleus.py --env stg -v -m "not Sms"

# 跑單一方法
pytest tests/test_sw_segments.py::TestSW::test_sw_segments_count2 --env stg -v# On Windows, set encoding first
$env:PYTHONUTF8=1

# All tests (auto-ordered: IP → Nucleus → page API → Segments → AvaLink)
pytest --env stg -v

# Run a single file
pytest tests/test_sw_segments.py --env stg -v

# Ava only / exclude SMS
pytest -m Ava --env stg -v
pytest tests/test_sw_nucleus.py --env stg -v -m "not Sms"

# Run a single method
pytest tests/test_sw_segments.py::TestSW::test_sw_segments_count2 --env stg -vAccount ID 不在 .env 裡。The Account ID isn't in .env.它是寫在 conftest.py 的 ENV_CONFIG 裡(例如 stg sw_nucleus.account_id=93)。換帳號要改程式碼,不是改 .env。各環境帳號請找主管或既有 auto_cl 維護者確認。 It lives in ENV_CONFIG inside conftest.py (e.g. stg sw_nucleus.account_id=93). Switching accounts means editing code, not .env. Ask your lead or the existing auto_cl maintainer for each environment's accounts.
產出物在哪Where the outputs land
reports/report.html— HTML 測試報告reports/report.html— HTML test reportreports/test.log— 完整 logreports/test.log— full logvideos/— 每次執行的單一連續影片(.webm,檔名帶環境與時間戳)videos/— one continuous video per run (.webm, filename carries env + timestamp)reports/ava_link_issues.json— Ava 連結異常(有異常才產生)reports/ava_link_issues.json— Ava link issues (only generated if any)reports/sw_page_api_issues.json— SW 頁面 API 檢查異常reports/sw_page_api_issues.json— SW page API check issuesreports/api_metrics.json— API 回應時間統計reports/api_metrics.json— API response time stats- 測試結束自動寄 Email / Teams 通知(若已設定)Auto-sends an Email / Teams notification when tests finish (if configured)
互動Interactive
Q&A 助理Q&A assistant
下面輸入框可以直接問問題——常見題會先給你題庫速答;同時問題會送進下方的即時 Q&A 板,管理員會在上面回答,其他人也能留言、點讚。再往下是整理好的分類 FAQ。Type a question in the box below — common ones get an instant answer from the FAQ; the question is also posted to the live Q&A board underneath, where admins answer and anyone can comment or like. Further down is the categorized FAQ.
即時 Q&A 板Live Q&A board
編輯後張貼到 Q&A 板Edit and post to the Q&A board
完整 FAQ(整理好的速查)Full FAQ (quick reference)
SW Manager 跟 Ava Messenger 到底差在哪?What's the real difference between SW Manager and Ava Messenger?
SW Manager(Samurai World)是「策略中樞」:管 Contact 主檔、匯入、Segment 分群、Trigger 觸發、Asset 素材、App Integration。決定 什麼時候、對誰、做什麼。SW Manager (Samurai World) is the "strategy hub": it manages the Contact master record, imports, Segment grouping, Trigger, Asset, and App Integration. It decides when, to whom, what.
Ava Messenger是「互動引擎」:實際執行對話、通話、Bot 回覆、IVR。決定 怎麼跟對方講話。Ava Messenger is the "interaction engine": it actually runs conversations, calls, Bot replies, and IVR. It decides how to talk to the person.
SW 透過 App Integration 用 API Key(=Ava Account ID)呼叫 Ava 開對話;Ava 完成後透過 Webhook 把 Journey Log / Opt-out 回寫 SW。兩者合起來才是 ContactLoop。SW calls Ava to open a conversation via App Integration using an API Key (= Ava Account ID); when Ava finishes it writes the Journey Log / Opt-out back to SW via Webhook. Together they're ContactLoop.
三個環境(stg / cl1 / prod)有什麼不同?我該用哪個?What's the difference between the three environments (stg / cl1 / prod)? Which should I use?
stg(staging.sw.onramplab.com):開發整合測試,新人練習、QA 跑測試都在這,低風險可亂搞。stg (staging.sw.onramplab.com): dev integration testing; new-hire practice and QA tests happen here. Low risk — break things freely.
cl1(manager-cl1.contactloop.com):Pre-prod / 客戶預覽,中風險,部分新版頁面可能還沒跟上 stg。cl1 (manager-cl1.contactloop.com): Pre-prod / customer preview. Medium risk; some new pages may lag behind stg.
prod(manager.contactloop.com):正式流量、真實客戶,高風險,勿任意匯入或觸發。prod (manager.contactloop.com): live traffic, real customers. High risk — don't import or trigger carelessly.
新人一律先用 stg。prod 帳號要特別申請,且操作會真的影響客戶。New hires always start in stg. A prod account requires special approval, and actions there affect real customers.
從 Ava 建帳號到 SW Segment 設定完成的完整流程是什麼?What's the full flow from creating an Ava account to finishing a SW Segment?
必須先 Ava 再 SW,因為 SW 需要 Ava 產生的 API Key 當對接鍵。Ava must come before SW, because SW needs the API Key Ava generates as the join key.
Phase 1 · Ava 端:/auth/signup 註冊使用者(Nickname/Email/Password → 收信)→ /auth/signin 登入 → /accounts 建 Account(Name + Transfer Phone Number + Organization,會開 Twilio 子帳號)→ 該 Account 的 Settings → API tab 建立 API Token,記下 Account ID + API Token。Phase 1 · Ava side: /auth/signup to register a user (Nickname/Email/Password → confirm email) → /auth/signin to log in → /accounts to create an Account (Name + Transfer Phone Number + Organization; a Twilio sub-account is provisioned) → that Account's Settings → API tab to create an API Token; note down Account ID + API Token.
Phase 2 · SW 端:/auth/signin 登入 → 建/選 SW Account(需先加入 Organization 並指給 User 才看得到)→ /app-integrations 建 Ava 整合(Account ID 填 Ava Account ID,stg 勾 Sandbox)→ Configuration 下建 Asset 訊息樣板(Interaction Type / Template / Campaign,發什麼)→ Configuration 下建 Segment 並驗證計數(對誰 + 何時)→ 建立 Action(Channel + 選 Asset,記得點 Add)指派回 Segment(用哪個管道)→ /contacts/import 匯入名單(命中 Segment 規則且 Action 已指派者才會觸發 Ava)→ /contacts-27 查看聯絡人資料。Segment + Asset + Action(已指派)+ 匯入四者設好,整條流程才算接通。Phase 2 · SW side: /auth/signin to log in → create/pick a SW Account (must be added to an Organization and assigned to the User before it's visible) → /app-integrations create the Ava integration (Account ID = Ava Account ID, check Sandbox in stg) → under Configuration create an Asset message template (Interaction Type / Template / Campaign, what) → under Configuration create a Segment and verify its count (to whom + when) → create an Action (Channel + pick the Asset, remember to click Add) and assign it to the Segment (which channel) → /contacts/import to import a list (only contacts matching the Segment rule with an assigned Action trigger Ava) → /contacts-27 to review the contacts. Only when Segment + Asset + Action (assigned) + import are all set is the flow connected end to end.
第一次全程請在 stg 跑;Ava Account 一旦建立會產生真實 Twilio 門號費用,prod 勿任意練習。Run the whole thing in stg the first time; creating an Ava Account incurs real Twilio number charges, so don't practice in prod.
怎麼切換 Account?How do I switch accounts?
點左上角的帳號切換器。SW 有三代 UI 相容,測試程式會依序嘗試:最新版是 button.crumb-account-button 按鈕、中版是 button.BreadcrumbTrigger、舊版是 Ant Select 下拉。選好後帳號名後會顯示 (ID: nn)。Ava 則用階層式 cascader 選帳號。Click the top-left account switcher. SW has three coexisting UI generations; the test tries them in order: newest is the button.crumb-account-button, mid is button.BreadcrumbTrigger, legacy is an Ant Select dropdown. After selecting, the account name shows (ID: nn). Ava uses a hierarchical cascader to pick accounts.
Account ID 在哪設定?為什麼 .env 裡找不到?Where is the Account ID configured? Why isn't it in .env?
Account ID 寫在 auto_cl/conftest.py 的 ENV_CONFIG 裡,不在 .env。例如 stg 的 sw_nucleus.account_id 是 "93"、cl1 是 "38"、prod 是 "361"。換帳號要改程式碼,且每個環境 ID 都不同,不能互通。The Account ID lives in ENV_CONFIG inside auto_cl/conftest.py, not in .env. For example stg's sw_nucleus.account_id is "93", cl1 is "38", prod is "361". Switching accounts means editing code, and each environment's ID is different — they don't carry over.
.env 必填欄位有哪些?Which .env fields are required?
基本跑頁面測試只需要該環境的 SW / Ava 帳密,例如 stg:STG_SW_EMAIL、STG_SW_PASSWORD、STG_AVA_EMAIL、STG_AVA_PASSWORD。For basic page tests you only need that environment's SW / Ava credentials, e.g. stg: STG_SW_EMAIL, STG_SW_PASSWORD, STG_AVA_EMAIL, STG_AVA_PASSWORD.
跑 Nucleus(SMS 整合流程)還需要 QUO_API_KEY、QUO_phoneNumberId、QUO_participants_stg。要收信通知需 SMTP_EMAIL/PASSWORD;要 Teams 通知需 TEAMS_WEBHOOK_URL;要上傳 R2 需 R2_*。範本見 .env.example。Running Nucleus (the SMS integration flow) also needs QUO_API_KEY, QUO_phoneNumberId, QUO_participants_stg. For email notifications add SMTP_EMAIL/PASSWORD; for Teams notifications TEAMS_WEBHOOK_URL; for R2 uploads R2_*. See .env.example for the template.
Admin 頁面進不去、一直 403?Can't get into Admin pages — keeps 403?
正常。/admin/*(如 admin/contacts、admin/actions)與 Configuration / Settings 類頁面需要 system-admin 權限,一般帳號會被擋 403。測試 test_sw_page_api_checks.py 因此只覆蓋非 Admin 頁面,避免把 403 誤判成 bug。要測 Admin 頁面得先用具備 system-admin 權限的帳號。That's expected. /admin/* (e.g. admin/contacts, admin/actions) and Configuration / Settings pages require system-admin permission; a normal account gets 403. That's why test_sw_page_api_checks.py only covers non-Admin pages, to avoid mistaking a 403 for a bug. To test Admin pages you need an account with system-admin permission.
Contacts-27 / Contacts (old) / Contacts Grid (old) 差在哪?What's the difference between Contacts-27 / Contacts (old) / Contacts Grid (old)?
Contacts-27(新版):主要列表,打 /api/contacts/grid,ag-grid 風格,回應 data.rows / data.lastRow。2026-08 前端改版後的標準頁。Contacts-27 (new): the main list, calls /api/contacts/grid, ag-grid style, returns data.rows / data.lastRow. The standard page after the 2026-08 frontend revamp.
Contacts (old):舊版,size=20 分頁,回應 data.result.contacts / meta。Contacts (old): legacy, size=20 pagination, returns data.result.contacts / meta.
Contacts Grid (old):舊版 ag-grid,同樣打 /api/contacts/grid。Contacts-26 (old) 則打 size=500,結構與 Contacts-27 相同。Contacts Grid (old): legacy ag-grid, also calls /api/contacts/grid. Contacts-26 (old) calls size=500 with the same structure as Contacts-27.
新舊並存是為了遷移過渡,新人操作請用 Contacts-27。Old and new coexist for migration; new hires should use Contacts-27.
Actions 頁面的 "Total: Filtered" 為什麼數字不對?Why is the "Total: Filtered" number on the Actions page wrong?
已知 bug(Trello f1cfO0nU)。時間範圍過大時,產生 grid 的 Elasticsearch terms aggregation 超過 bucket_limit(60000),回應的 meta.completeness.capped=true,導致 Total: Filtered 嚴重低估(3 個月範圍差約 2.4 倍)。Known bug (Trello f1cfO0nU). When the time range is too large, the Elasticsearch terms aggregation that builds the grid exceeds bucket_limit (60000), the response sets meta.completeness.capped=true, and Total: Filtered is badly undercounted (a 3-month range is off by ~2.4x).
測試 TestActionsTotalCompletenessRegression 會斷言 capped=false,後端修復前預期失敗(xfail),不會讓 CI 變紅;修復後會自動轉 XPASS 提醒可以拿掉 xfail。The test TestActionsTotalCompletenessRegression asserts capped=false; until the backend is fixed it's expected to fail (xfail) so it doesn't turn CI red. Once fixed it auto-flips to XPASS, signaling the xfail can be removed.
CL1 的某些頁面 API 檢查為什麼是 xfail?Why are some CL1 page API checks xfail?
這是「環境版本落差」,不是壞掉。stg 通常是最新版,cl1 / prod 的前端部署會晚一點跟上。例如 2026-08 實測:stg 的 Marketing Sources / Endpoint Attributes / Technographics 已改打 /api/contacts/grid,但 cl1 還在打舊版 /api/contacts?…size=500。It's an "environment version lag", not a breakage. stg is usually the newest; cl1 / prod frontends deploy a bit later. Example from 2026-08: stg's Marketing Sources / Endpoint Attributes / Technographics already call /api/contacts/grid, but cl1 still calls the legacy /api/contacts?…size=500.
這類情況登記在 KNOWN_ENV_LAG_XFAILS,標成 xfail 避免每次 CI 跑都被通知洗版;等 cl1 部署跟上會自動轉 XPASS,屆時就可拿掉該設定。These are listed in KNOWN_ENV_LAG_XFAILS and marked xfail so CI runs don't spam notifications; when cl1 catches up it auto-flips to XPASS and the setting can be removed.
SMS 驗證為什麼改用 Quo?Toky 不能用了嗎?Why did SMS verification switch to Quo? Is Toky unusable now?
2026-08 起 SMS 從 Toky 換成 Quo。Toky 已停止 SMS 發送服務、只剩接收,所以測試用的 lead 號碼與模擬發送都改用 Quo API。讀取驗證與模擬 lead 發訊都走 api.quo.com/v1/messages,Authorization header 直接帶 API Key(非 Bearer 格式)。號碼用 E.164 格式(+1…)。From 2026-08 SMS moved from Toky to Quo. Toky stopped SMS sending and only receives, so test lead numbers and simulated sends now use the Quo API. Read verification and simulated lead messaging both go through api.quo.com/v1/messages, with the API Key placed directly in the Authorization header (not Bearer format). Numbers use E.164 format (+1…).
怎麼只跑某一個測試?How do I run just one test?
單支檔:pytest tests/test_sw_segments.py --env stg -vOne file: pytest tests/test_sw_segments.py --env stg -v
單一方法:pytest tests/test_sw_segments.py::TestSW::test_sw_segments_count2 --env stg -vOne method: pytest tests/test_sw_segments.py::TestSW::test_sw_segments_count2 --env stg -v
依 marker:pytest -m Ava --env stg -v(只跑 Ava)、pytest -m "not Sms" --env stg -v(排除 SMS)By marker: pytest -m Ava --env stg -v (Ava only), pytest -m "not Sms" --env stg -v (exclude SMS)
Windows 記得先 $env:PYTHONUTF8=1 避免編碼問題。On Windows, run $env:PYTHONUTF8=1 first to avoid encoding issues.
測試影片與報告在哪裡?Where are the test videos and reports?
報告:reports/report.html;log:reports/test.log;影片:videos/(檔名帶環境與時間戳,單一連續影片含連結頁面訪問);API 統計:reports/api_metrics.json。有異常時額外產生 reports/ava_link_issues.json 與 reports/sw_page_api_issues.json。runs/ 會自動保留最新 10 份歸檔。Report: reports/report.html; log: reports/test.log; video: videos/ (filename carries environment + timestamp; a single continuous video includes the linked-page visits); API stats: reports/api_metrics.json. On anomalies it also emits reports/ava_link_issues.json and reports/sw_page_api_issues.json. runs/ auto-keeps the latest 10 archives.
Ava 連結驗證失敗代表什麼?What does an Ava link-verification failure mean?
test_ava_link.py 會對每個 account 抽 3–5 則對話,點擊 Ava 發送的連結驗證 HTTP 狀態。chrome-error:// / about: 代表瀏覽器層連不上;HTTP ≥ 400 代表連結頁面異常。測試整體仍會 PASSED(連結異常不中止測試),但會把異常寫進 reports/ava_link_issues.json,Email / Teams 通知會附專屬異常表格,需人工確認。test_ava_link.py samples 3–5 conversations per account and clicks the links Ava sent to verify the HTTP status. chrome-error:// / about: means the browser layer can't connect; HTTP ≥ 400 means the linked page is broken. The overall test still PASSED (link issues don't abort the run), but anomalies are written to reports/ava_link_issues.json, and the Email / Teams notification attaches a dedicated anomaly table for manual review.
通知信出現 Gmail 535 錯誤怎麼解?How do I fix a Gmail 535 error in notification emails?
535 是 SMTP 認證失敗。確認 SMTP_EMAIL 與 SMTP_PASSWORD 正確——Gmail 不能用主密碼,必須在 Google 帳號安全設定裡建立 App Password 並用那組密碼。535 is an SMTP auth failure. Check that SMTP_EMAIL and SMTP_PASSWORD are correct — Gmail won't accept your main password; you must create an App Password in your Google account security settings and use that.