從 0 開始 · 路線 AFrom scratch · Track A
從 Ava 建帳號到 SW Segment 設定完成From an Ava account to a complete SW Segment
這條路線是一條跨系統的完整流程:先在 Ava Messenger 建立一個新的 Account,再到 SW Manager 用它的 Account ID 接上、匯入名單、把 Segment 設到好。全程以 stg 環境為例,不碰任何程式碼。This track is a complete cross-system flow: first create a new Account in Ava Messenger, then use its Account ID in SW Manager to connect, import a list, and finish setting up a Segment. Everything uses stg as the example — no code involved.
整條流程的「橋」是 Ava Account ID(填進 SW App Integration 的 Account ID 欄位;stg 環境還要記得勾 Sandbox)。Ava 端建帳號時產生,SW 端 App Integration 消費。所以必須先做 Ava、再做 SW,順序不能反。The "bridge" of the whole flow is the Ava Account ID (goes into SW App Integration's Account ID field; remember to check Sandbox in stg). It's generated when you create the Ava account and consumed by SW's App Integration. So you must do Ava first, then SW — the order can't be reversed.
建立影片參考:Zight 錄影 — Ava 建立新 Account 全程Reference recording: Zight recording — creating a new Ava Account, start to finish
Phase 1 · Ava 端 — 建立帳號、Bot、CampaignPhase 1 · Ava side — create the Account, Bot, and Campaign
-
取得 Ava 登入帳號(signup 目前是 stub)Get an Ava login account (signup is currently a stub)
⚠️ 注意:
/auth/signup頁面目前是 stub——填 Nickname/Email/Password 送出後只會跳「Account created. Please check your inbox!」提示,不會呼叫任何 API、不寄確認信、也不會真的建帳號。所以登入帳號請改由已存在的 system-admin 建立再提供給你。stg 環境大多數 user 拿到的都是 system-admin 權限,可直接用來跑後續流程。這一步建立的是「登入使用者」,還不是業務 Account(業務 Account 在下面「建立新的 Ava Account」步驟建)。⚠️ Note: the/auth/signuppage is currently a stub — submitting Nickname/Email/Password only shows "Account created. Please check your inbox!" but calls no API, sends no confirmation email, and does not actually create an account. So have an existing system-admin create your login user and hand it to you. In stg most users are given system-admin rights, which is enough to run the rest of this flow. This step is about the "login user," not the business Account (that's the "Create a new Ava Account" step below). -
登入 Ava MessengerSign in to Ava Messenger
確認信完成後到
/auth/signin用 Email + Password 登入,進入 Ava 主畫面。stg / cl1 / prod 是三套獨立的 Ava,帳號不互通。Once confirmed, go to/auth/signinand sign in with Email + Password to reach the Ava main screen. stg / cl1 / prod are three separate Ava deployments — accounts don't carry over. -
綁定 Google(建立 Account 的前提)Link Google (required before creating an Account)
⚠️ 沒綁 Google 就建不了 Account,就算是 system-admin 也一樣。沒綁的話,Account 列表的 Create 按鈕和上方帳號選單的 Create New Account 都是灰的,滑過去會提示「Please link to google first.」。
綁定方式(任選一個):
・右上角使用者選單 → Profile → Google 那列按 Link → 完成 Google 授權 → 回來顯示 Linked。
・上方帳號選單底部,灰色按鈕下的提示「…Please click here to link to google first.」,點 here。
綁好後按鈕就能按了。一個 Google 帳號只能綁一個使用者;如果出現「Please link to google email which is not linked to this account yet…」,代表這個 Google 帳號已經綁在別的使用者身上,要換一個。
為什麼要綁:建立 Account 的人會成為它的 Account Owner,之後這個 Account 建立 Dialogflow 類型的 Bot 時,會用 Owner 綁定的 Google 授權在 Google 雲端開專案。詳見 Ava 介面導覽 → 使用者選單。⚠️ You can't create an Account without linking Google — even as a system-admin. Until you do, the Account list's Create button and the top account selector's Create New Account are both gray, with the hint "Please link to google first."
Link it either way:
・User menu (top right) → Profile → press Link on the Google row → finish Google authorization → it shows Linked.
・At the bottom of the account selector, under the gray button: "…Please click here to link to google first." — click "here".
Once linked, the buttons work. A Google account can be linked to only one user; if you see "Please link to google email which is not linked to this account yet…", that Google account is already linked to another user — use a different one.
Why: whoever creates the Account becomes its Account Owner, and when the Account later creates a Dialogflow-type Bot, the Owner's Google authorization is used to open a project in Google Cloud. See Ava tour → user menu. -
建立新的 Ava AccountCreate a new Ava Account
從 admin 進入 Account 列表(
/accounts)後,點右上角 Create 建立新 Account。必填:Name(帳號名)、Transfer Phone Number(轉接號碼,預設走 Dial Transfer,之後可在 Settings 改 Streaming Transfer)、Organization(所屬組織,下拉選)。From admin, go to the Account list (/accounts) and click Create at the top right to make a new Account. Required: Name, Transfer Phone Number (defaults to Dial Transfer; switch to Streaming Transfer later in Settings), Organization (dropdown).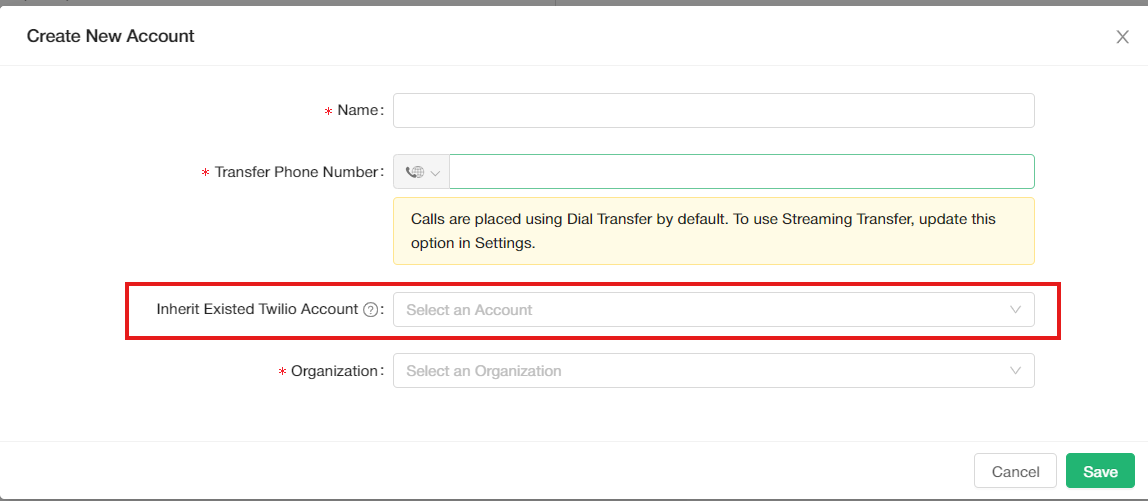 img/AVA1.png
Create New Account 表單Create New Account form ⚠️
Inherit Existed Twilio Account欄位請務必依照A2P 詳解裡「各環境要 Inherit 哪個帳號」的對照表填(stg / prod / cl1 各不同)——若這裡沒設定,新 Account 會沒有 A2P 資格,之後無法發送任何 SMS 或撥打電話。
🔒 權限:/accounts屬於 Admin 群組(roles: []= 僅 system-admin),Cascader 的「Create New Account」也需要ACCOUNT_CREATE權限——所以這一步必須用 system-admin 帳號,而且要已經綁好 Google(上一步)。stg 環境大多數 user 都是 system-admin,可直接做;若你不是,請找 system-admin 協助建 Account。
建立完成後刷新頁面,再進入剛建立的 Account 做接下來的設定。💡 小提示:在 Account 列表找剛建立的那筆,可以點 ID 欄排序,最新建立的會排到最上面(或最下面,依排序方向)。⚠️ SetInherit Existed Twilio Accountexactly per the "which account to inherit, per environment" table in the A2P detail section (different for stg / prod / cl1) — without it, the new Account has no A2P eligibility and can't send any SMS or make calls afterward.
🔒 Permissions:/accountsis in the Admin group (roles: []= system-admin only) and the Cascader's "Create New Account" also needs theACCOUNT_CREATEpermission — so this step requires a system-admin account that has already linked Google (previous step). In stg most users are system-admin and can do it directly; otherwise ask a system-admin to create the Account for you.
After creating it, refresh the page, then enter the new Account to continue. 💡 Tip: in the Account list, sort by the ID column to bring the newest one to the top (or bottom, depending on sort direction). -
建立 Bot(Campaign 的必要前提)Create a Bot (a prerequisite for the Campaign)
⚠️ 要先建立 Bot,否則無法建立 Campaign。一樣點右上角 Create 建立新 Bot(
/accounts/{accountId}/bots/create)。⚠️ A Bot must exist before you can create a Campaign. Click Create at the top right again to make a new Bot (/accounts/{accountId}/bots/create).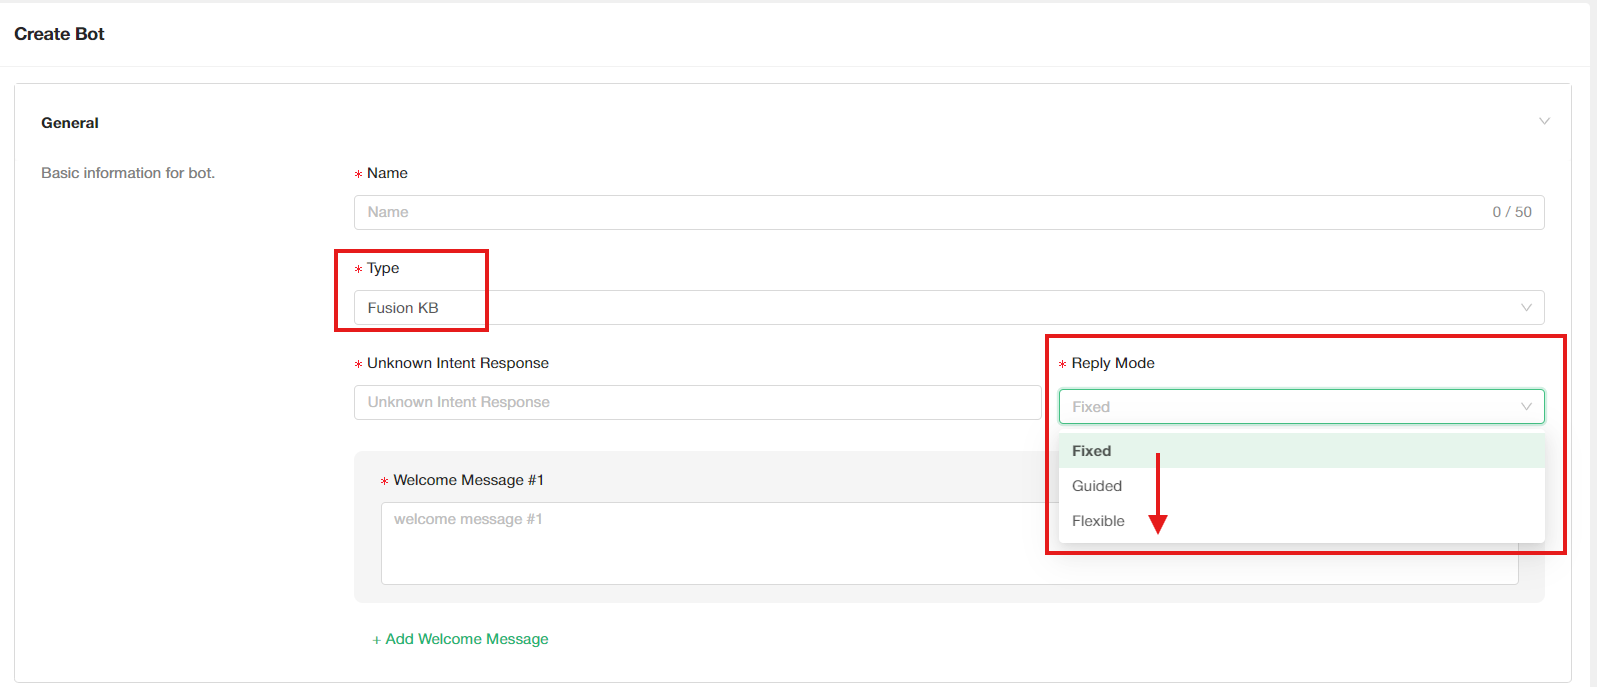 img/AVA2.png
Create Bot 表單Create Bot form Name:Bot 名稱。Name: the Bot's name.
Type 選 Fusion KB(另一個選項 DialogFlow 需要 user 先跟 Google 連通帳號,暫時不用管)。Type — pick Fusion KB (the other option, DialogFlow, needs the user's Google account linked first — skip it for now).
Welcome Message——這則訊息只有在 Ava → Bots → Chat Simulator 測試時會出現,平常用實體號碼測試不會看到它,屬正常現象,不是沒設定成功。表單現在支援用「+ Add Welcome Message」新增多筆訊息(
Form.List),不再只有單一欄位。Welcome Message — this only ever shows up in Ava → Bots → Chat Simulator; testing with a real phone number won't show it, which is expected, not a misconfiguration. The form now supports adding multiple messages via "+ Add Welcome Message" (aForm.List), not just a single field.Reply Mode 由上到下是 Fixed(死板)→ Guided → Flexible(靈活)。⚠️ 這其實是兩層設定:General 區塊裡「Unknown Intent Response」搭配的 Reply Mode 只管 AI 聽不懂時怎麼回;獨立的「Reply Mode」collapse 區塊才是這裡講的整體 Reply Mode。兩者都可能在 Campaign 層或 Account 層被覆蓋,優先序是 Campaign Intent Level > Account Intent Level > Bot Level——在這裡設的只是最底層的預設值。Reply Mode ranges from Fixed (rigid) → Guided → Flexible. ⚠️ This is actually two separate settings: the Reply Mode paired with "Unknown Intent Response" in the General block only controls what happens when the AI doesn't understand; the standalone "Reply Mode" collapse section is the overall Reply Mode being described here. Both can be overridden at the Campaign or Account level, with priority Campaign Intent Level > Account Intent Level > Bot Level — what you set here is just the bottom-level default.
Intent Group 一開始可以先選前面有
-前綴的四個(用 Transfer 元件從 Available 移到 My Intent Groups),之後有需求再自行新增。Intent Group — for a first setup, pick the four groups prefixed with-(move them from Available to My Intent Groups via the Transfer widget), and add more later as needed. -
建立 CampaignCreate the Campaign
Bot 建好後,一樣點右上角 Create 建立新 Campaign。精靈只需要填 Name,其他步驟(Default Language、Default Timezone、後續的 IVR/Conversation 設定)都有預設值,一路按 Continue 到底即可——這些之後都能回 Campaign Settings 再調整。Once the Bot exists, click Create at the top right again for the Campaign. The wizard only needs a Name — the other steps (Default Language, Default Timezone, and the IVR/Conversation setup that follows) all have defaults, so just click Continue through them. Everything can be revisited later in Campaign Settings.
-
確認 Account ID 與 Campaign ID 都已記錄Confirm the Account ID and Campaign ID are both recorded
以上是 Ava 建立新 Account 的完整步驟。收尾前務必確認沒有遺漏:Account ID(Account 列表
Name (ID: nn))和 Campaign ID(Campaign 列表同樣格式)都要存在、記錄下來——接下來 SW 那邊(Phase 2)的 Asset / Integration 都會用到。That covers the full Ava new-Account setup. Before moving on, confirm nothing was missed: both the Account ID (Account list showsName (ID: nn)) and the Campaign ID (same format in the Campaign list) exist and are recorded — Phase 2 on the SW side (Asset / Integration) will need them.
Phase 2 · SW 端 — 建 Account、接上 Ava、完成 SegmentPhase 2 · SW side — create the Account, connect Ava, complete the Segment
建立影片參考:Zight 錄影 — SW 建立新 Account 到觸發 SegmentReference recording: Zight recording — SW from a new Account to triggering the Segment
-
登入 SW Manager 並建立新 AccountSign in to SW Manager and create a new Account
開
https://staging.sw.onramplab.com/auth/signin,輸入 SW 的 Email + 密碼登入(看到 "home" 字樣即成功)。從 settings/admin 進入 Accounts 列表,點右上角 Create 建立新 Account。Openhttps://staging.sw.onramplab.com/auth/signin, sign in with the SW Email + password (you'll see "home" when it works). From settings/admin, go to the Accounts list and click Create at the top right to make a new Account.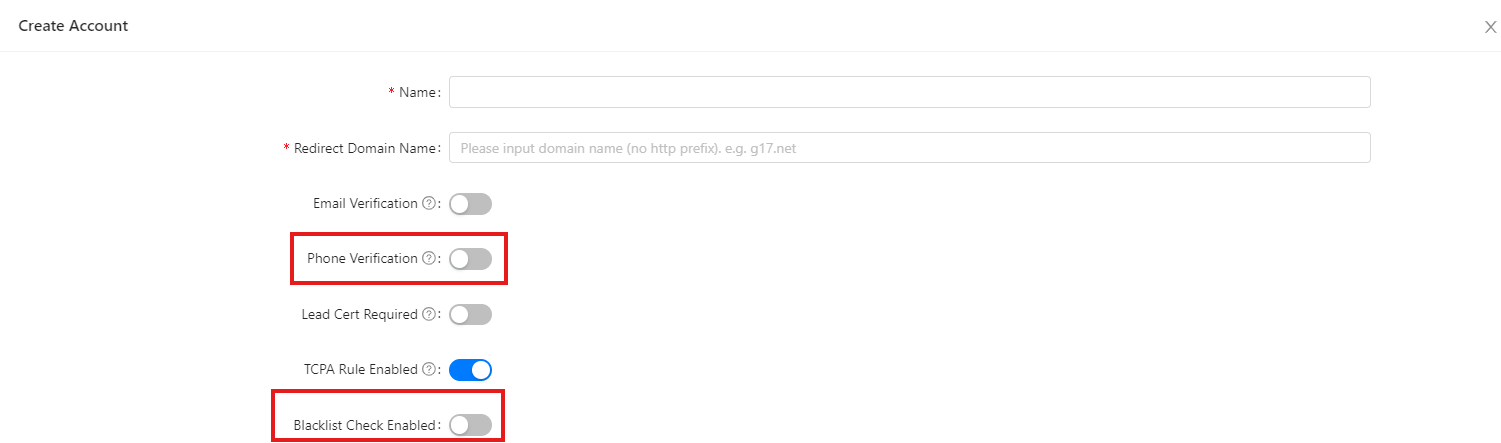 img/SW1.png
Create Account 表單Create Account form 表單裡兩個欄位要特別注意:
⚠️ Phone Verification 開啟的話,非美國的正式號碼會被阻擋並加入黑名單——如果客戶名單有海外門號,先確認這個開關的影響。
⚠️ Blacklist Check Enabled 開啟的話,匯入時會檢查號碼是否在一些已知黑名單裡。
💡 Redirect Domain 先跟著外面其他 Account 填一樣的值就好,不用自己另外想。Two fields in the form need attention:
⚠️ Phone Verification, if enabled, will block and blacklist any non-US real number — check this if your contact list has overseas numbers.
⚠️ Blacklist Check Enabled, if enabled, checks numbers against known blacklists on import.
💡 For Redirect Domain, just match whatever value other existing Accounts use — no need to invent your own. -
把新 Account 加入 Organization,再把 Organization 指給你的 UserAdd the new Account to an Organization, then assign that Organization to your User
⚠️ 建立完 Account 後,即使刷新頁面,也沒辦法在帳號切換器上馬上看到剛建立的 Account——這不是壞掉,是因為新 Account 還沒被指派給任何人。要讓自己的 User 看得到它,需要兩步:
① 進 admin → Organization,把剛建的 Account 加入一個 Organization(attachAccounts,只能選還沒被任何 Organization 綁定的自由帳號)。
② 進 admin → Users,編輯你自己的 User,在 Organizations多選欄裡把該 Organization 加進去——User 會 inherit 這個 Organization 底下所有 Account(唯讀顯示在下方確認)。⚠️ After creating the Account, even refreshing the page won't make it show up in the account switcher right away — that's not a bug, it's because the new Account isn't assigned to anyone yet. To make it visible to your User, two steps:
① Go to admin → Organization, and add the new Account to an Organization (attachAccounts— only unassigned free accounts are selectable).
② Go to admin → Users, edit your own User, and add that Organization in the Organizations multi-select field — the User inherits every Account under that Organization (shown read-only below for confirmation).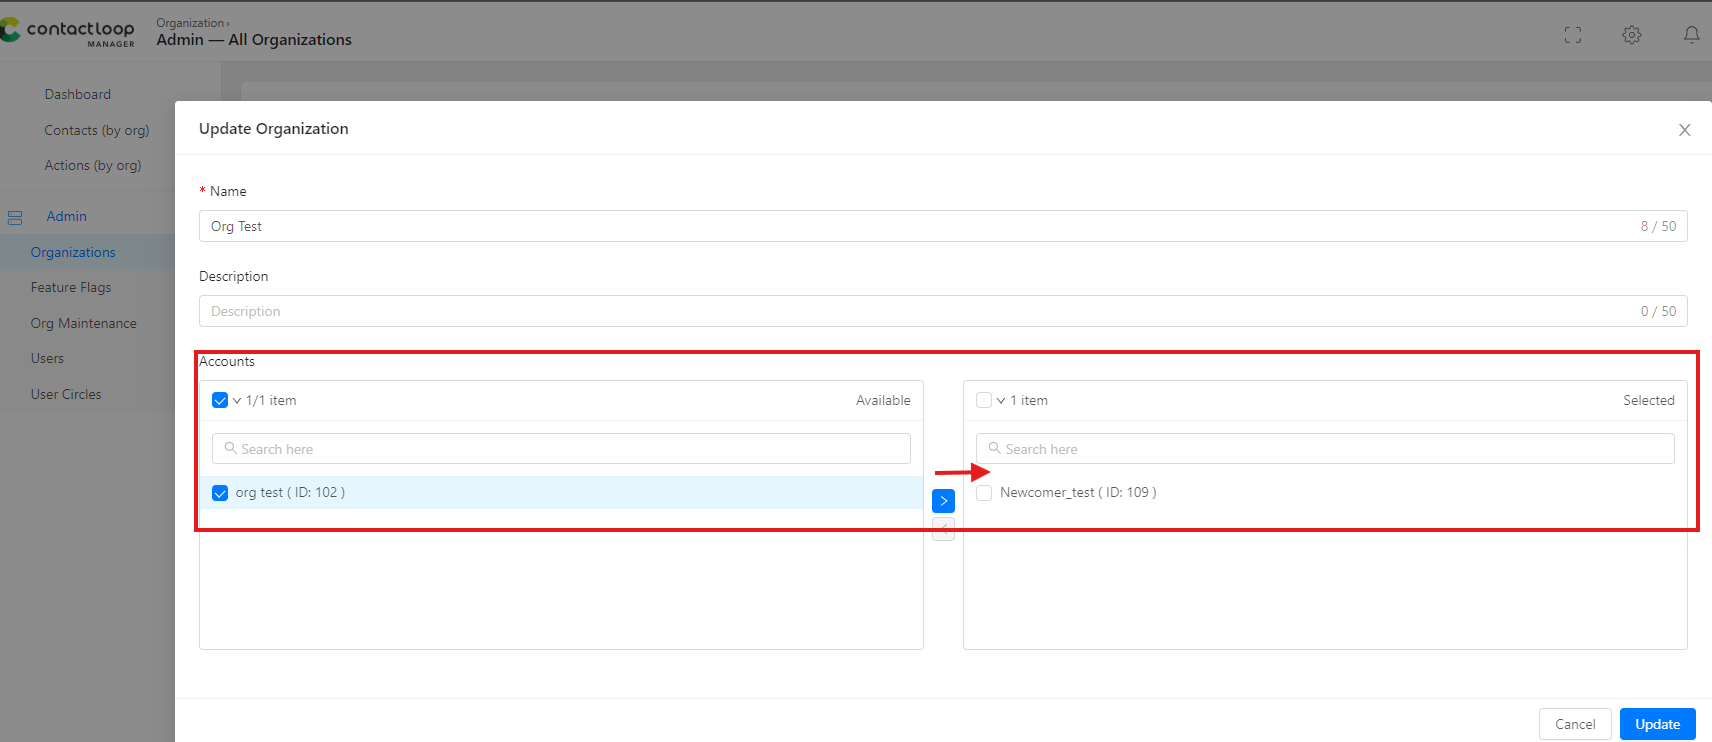 img/SW2.png
admin → Organization:Add Accountadmin → Organization: Add Account 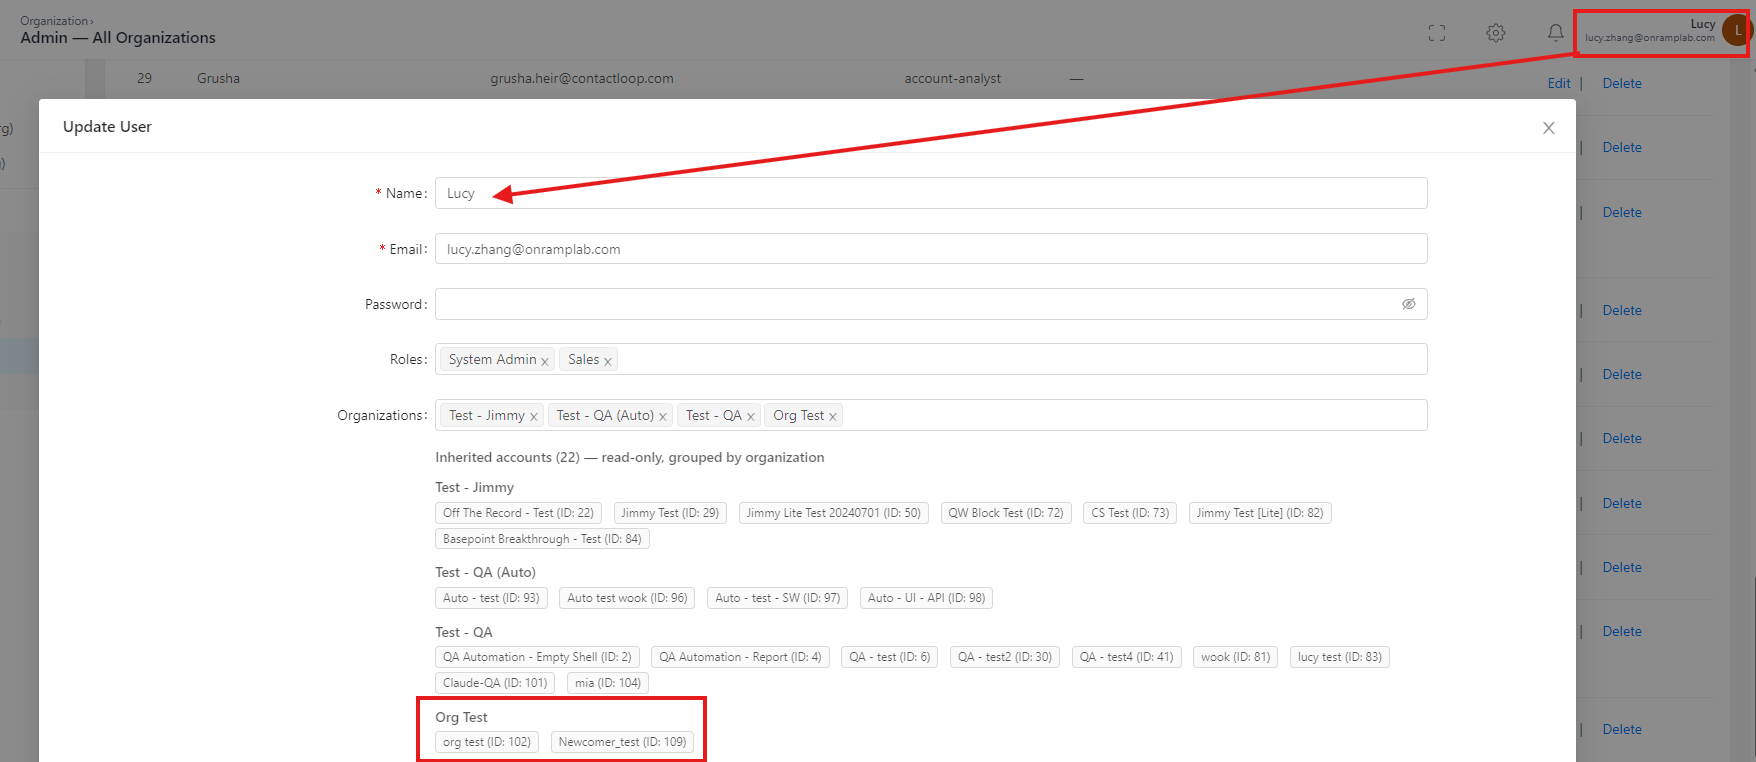 img/SW3.png
admin → Users:把 Organization 指給 Useradmin → Users: assign the Organization to the User -
切換到新 Account,建立 App Integration(接 Ava)Switch to the new Account and create an App Integration (connect Ava)
點左上角 logo 離開 admin 頁面,用帳號切換器切到剛新增的 Account。點 settings/admin 進入
/app-integrations,一樣點右上角 Create 建立新的 App Integration。Click the top-left logo to leave the admin pages, then use the account switcher to switch to the new Account. Go to settings/admin →/app-integrations, and click Create at the top right again.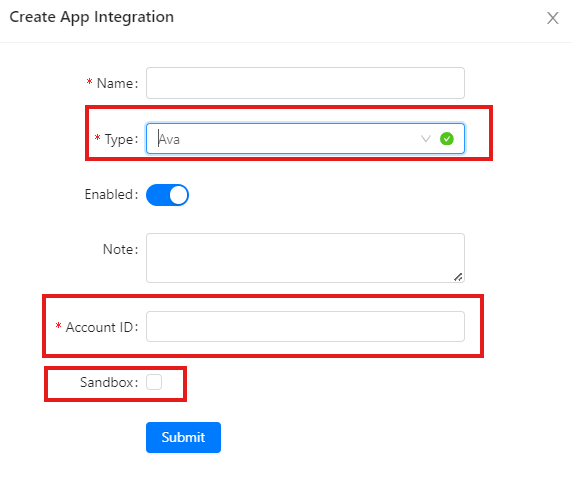 img/SW4.png
Create App Integration 表單Create App Integration form Type 選 Ava。這個表單只有兩個欄位:Account ID——這裡填的其實是 Phase 1 拿到的 Ava Account ID(目前實作把它存進後端叫
api_key的欄位,是暫時的技術債,不代表要另外填一組 API Key);Sandbox checkbox——在 stg 環境一定要勾選 Sandbox,才能連到 Ava。沒設這一步,後續 Action 呼叫 Ava 不會生效。Type = Ava. This form only has two fields: Account ID — you actually put the Ava Account ID from Phase 1 here (the backend currently stores it in a field literally calledapi_key, which is a temporary implementation detail, not a separate API Key you need to fill in); Sandbox checkbox — in stg you must check Sandbox to reach Ava. Skip this step and later Actions calling Ava won't work. -
到 Configuration 建立 AssetGo to Configuration and create an Asset
建好 App Integration 後,到左側選單的 Configuration 群組建立 Asset——⚠️ 每個 App Integration 有自己的子項目,要在剛建立的那個 App Integration 名稱底下建 Asset,別選錯了。一樣點右上角 Create。Once the App Integration exists, go to the Configuration group in the left sidebar to create an Asset — ⚠️ each App Integration has its own sub-items, so make sure you create the Asset under the App Integration you just made, not a different one. Click Create at the top right again.
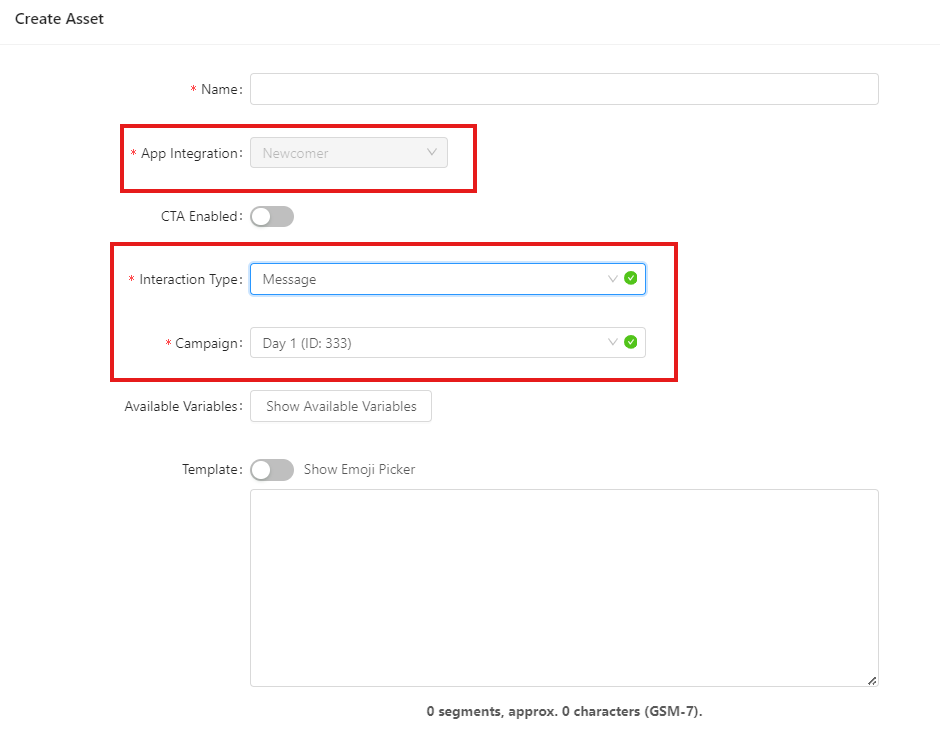 img/SW5.png
Create Asset 表單Create Asset form 先確認 App Integration 名稱是不是選對了那個 Ava 整合,再選 Interaction Type(目前 Ava 只有兩種:Message / Call)、選 Campaign。如果 Interaction Type 選 Message,需要填 Template 作為 Ava 要傳送的訊息內容;選 Call 則不用填。First confirm the App Integration name is the right Ava integration, then pick Interaction Type (currently only two for Ava: Message / Call) and pick a Campaign. If Interaction Type is Message, fill in a Template for what Ava will actually send; Call doesn't need one.
-
到 Configuration 建立 SegmentGo to Configuration and create a Segment
一樣在 Configuration 裡,點右上角 Create 建立新 Segment。Still under Configuration, click Create at the top right to make a new Segment.
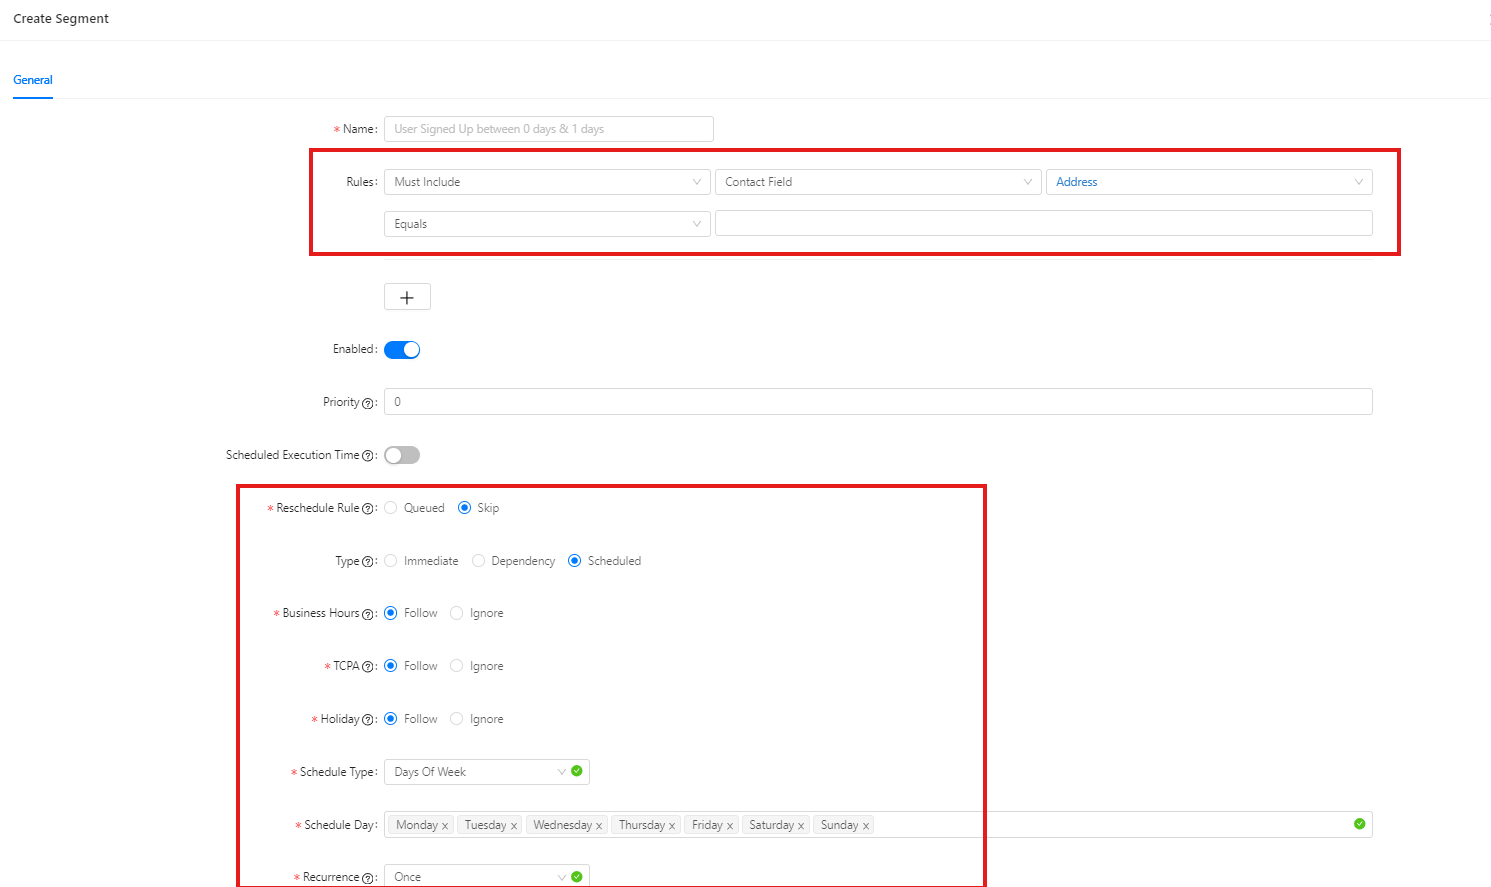 img/SW6.png
Create Segment 表單Create Segment form 表單上半部的 Rules(資料篩選)是觸發條件設定——決定哪些聯絡人算命中這個 Segment。下半部從 Reschedule Rule 開始一路到底的欄位(
Type、Business Hours、TCPA、Holiday等)是觸發時間設定——決定命中的聯絡人「什麼時候」被真正觸發。存檔後頁面會直接接著要求你設定 Action。The Rules section (data filtering) at the top of the form is the trigger-condition setup — it decides which contacts count as matching this Segment. Everything from Reschedule Rule onward (Type,Business Hours,TCPA,Holiday, etc.) is the trigger-timing setup — it decides when a matching contact actually gets triggered. Saving takes you straight into setting up the Action. -
設定 Action(選 Channel,可行內建立 Asset)Set up the Action (pick a Channel, optionally create the Asset inline)
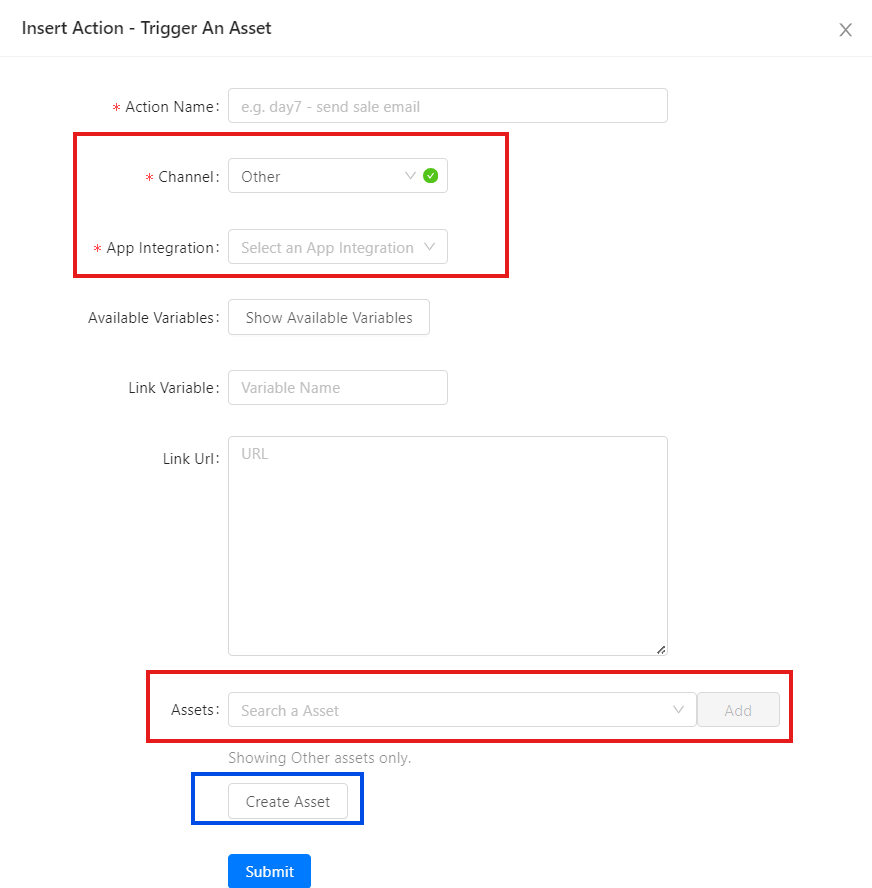 img/SW7.png
Action:Channel + Asset 選擇Action: Channel + Asset selection Channel 要跟剛剛建立的 Asset 對應:
· 若 Asset 是 Message → Channel 選 SMS。
· 若 Asset 是 Call → Channel 選 Active Dials。
· Other 是給非 Ava 在用的其他整合類型選的,這條路線用不到。
💡 如果前面沒有先建好 Asset,也可以在這個畫面直接建立:先選好 Channel 和要建在哪個 App Integration 底下,再點下面的 Create Asset 按鈕,彈出的表單就是完整的 Asset 建立流程。⚠️ 這個行內表單目前把 App Integration / Interaction Type 鎖成唯讀(顯示「Inherited from Action」),直接繼承 Action 已選的 Channel,不能在這裡改;要編輯這兩欄請改走 Configuration → Assets → Create 獨立路徑。
⚠️ 關鍵:在下拉選單裡選好要用的模板(Asset)後,一定要點旁邊的 Add 按鈕——不點 Add,選擇不會生效,Action 就等於沒接上任何 Asset。
💡 若這個帳號底下有不只一個 Ava App Integration,這裡要手動選要用哪一個;如果帳號完全沒有 Ava 整合,會看到提示「No Ava integration found for this account. Set one up under App Integrations to use SMS / Active Dials.」,回到上一步先建好。The Channel must match the Asset you just created:
· If the Asset is Message → pick SMS.
· If the Asset is Call → pick Active Dials.
· Other is for non-Ava integration types — not used on this track.
💡 If you didn't create an Asset beforehand, you can create it right here: pick the Channel and which App Integration it belongs to, then click the Create Asset button below — the modal that opens is the full Asset creation flow. ⚠️ This inline form currently locks App Integration / Interaction Type as read-only (shown as "Inherited from Action"), inheriting whatever Channel the Action already has selected — you can't change them here. To edit those two fields, use the standalone Configuration → Assets → Create path instead.
⚠️ Key rule: after picking the template (Asset) you want in the dropdown, you must click the Add button next to it — without clicking Add, the selection doesn't take effect and the Action ends up with no Asset attached at all.
💡 If this account has more than one Ava App Integration, you'll need to pick which one to use here; if it has none at all, you'll see "No Ava integration found for this account. Set one up under App Integrations to use SMS / Active Dials." — go back and create one first. -
匯入聯絡人(Contacts)Import contacts
Contacts 選單 → Import Contact(stg 新版會在新分頁開啟)。貼上 CSV,欄位:
phone, first_name, last_name, email, external_lead_id, traffic_source。匯入後,命中 Segment 規則的聯絡人會觸發「已指派給該 Segment 的 Action」,Action 再透過 App Integration 呼叫 Ava 發送(首則訊息 / 外呼)。⚠️ 若 Action 沒建或沒指派給 Segment,匯入只會把聯絡人寫入 SW,不會觸發任何訊息——這是「匯入了卻沒動」最常見的原因。Contacts menu → Import Contact (the stg new UI opens it in a new tab). Paste a CSV with fields:phone, first_name, last_name, email, external_lead_id, traffic_source. After import, a contact matching the Segment rule triggers the Action assigned to that Segment, and the Action calls Ava through the App Integration to send (first message / outbound call). ⚠️ If no Action is created or it isn't assigned to the Segment, the import only writes the contact to SW and triggers nothing — the most common cause of "imported but nothing happened." -
查看 Contacts-27 聯絡人資料Review contacts in Contacts-27
到
/contacts-27開啟聯絡人總覽(新版 ag-grid,進頁會打/api/contacts/grid,回應data.rows / data.lastRow)。在這裡確認剛匯入的聯絡人是否出現、用欄位排序與篩選查看 phone / first_name / last_name / email 等欄位。2026-08 起前端已改打 grid API,舊的size=500列表行為已不適用;若要對照舊版,可看/contacts(old,size=20)或/contacts-2026(old,size=500),新人日常請以 Contacts-27 為準。Go to/contacts-27to open the contact overview (new ag-grid; on load it calls/api/contacts/grid, returnsdata.rows / data.lastRow). Confirm your imported contacts appear, and sort/filter by phone / first_name / last_name / email. As of 2026-08 the frontend uses the grid API; the oldsize=500list behavior no longer applies. To compare with the old version, see/contacts(old,size=20) or/contacts-2026(old,size=500) — but day-to-day, use Contacts-27.
先在 stg 跑完整條,確認對話真的接起來再碰 prod。Run the whole flow in stg first and confirm the conversation actually connects before touching prod.prod 匯入真實名單會真的發 SMS / 打電話給客戶,且受 TCPA 限制與營業時間(Business Hours)管控,出錯無法回收。Ava Account 一旦建立會開出真實 Twilio 門號費用,練習請用 stg。 Importing a real list in prod actually sends SMS / calls customers, governed by TCPA restrictions and Business Hours, and mistakes can't be undone. Creating an Ava Account incurs real Twilio number charges, so practice in stg.
流程總覽(整條從頭到尾的一頁式總圖)Flow overview (the whole thing on one page)
Ava 登入帳號(由 system-admin 建立;signup 是 stub)→ Ava signin
   │
   ▼
右上使用者選單 → Profile → Google → Link〔沒綁 Google 不能建 Account〕
   │
   ▼
Ava /accounts → Create New Account(Name + Transfer Phone + Organization)〔需 system-admin〕
   │  產生 Ava Account ID  ←── 整條流程的「橋」
   ▼
Ava 建 Bot(Campaign 必要前提)→ 建 Campaign
   │
   ▼
SW signin → 選 SW Account
   │
   ▼
SW /app-integrations → Type=Ava,Account ID 填 Ava Account ID,stg 勾選 Sandbox
   │
   ▼
SW /assets → 建 Asset(樣板 + 變數 + Ava Campaign = 發什麼)
   │
   ▼
SW /segments → 建 Segment(規則 = 對誰 + Trigger 何時)→「Next - Create Action」
   │
   ▼
SW 建 Action(Channel + App Integration + 選 Asset)→ 指派回 Segment(action_id)
   │
   ▼
SW Import Contacts(命中規則者 count +1 → 觸發【已指派給 Segment 的 Action】→ Ava 發訊息)
   │
   ▼
SW /contacts-27 → 查看聯絡人資料
   │
   ▼  Phase 3 · 回 Ava 確認訊息與行為執行
Ava Cascader 選 Account/Campaign → Conversations 看對話 + 首則訊息 + Bot 回話
   │
   ▼
Ava Stats(Call Performance / Conversion)→ 確認行為有執行 ✓ 完成Ava login user (created by a system-admin; signup is a stub) → Ava signin
   │
   ▼
User menu → Profile → Google → Link [no Google link = can't create an Account]
   │
   ▼
Ava /accounts → Create New Account (Name + Transfer Phone + Organization) [system-admin only]
   │  generates the Ava Account ID  ←── the "bridge" of the whole flow
   ▼
Ava create a Bot (prerequisite for the Campaign) → create the Campaign
   │
   ▼
SW signin → pick a SW Account
   │
   ▼
SW /app-integrations → Type=Ava, Account ID = Ava Account ID, check Sandbox in stg
   │
   ▼
SW /assets → create an Asset (template + variables + Ava Campaign = what)
   │
   ▼
SW /segments → create a Segment (rule = to whom + trigger when) → "Next - Create Action"
   │
   ▼
SW create Action (Channel + App Integration + pick Asset) → assign back to Segment (action_id)
   │
   ▼
SW Import Contacts (matching ones count +1 → trigger the Action assigned to the Segment → Ava sends)
   │
   ▼
SW /contacts-27 → review the contacts
   │
   ▼  Phase 3 · back to Ava to confirm messages & behavior executed
Ava Cascader pick Account/Campaign → Conversations: see the thread + first message + Bot reply
   │
   ▼
Ava Stats (Call Performance / Conversion) → confirm behavior executed ✓ done
Phase 3 · 回 Ava 確認訊息與行為有執行Phase 3 · Back to Ava to confirm messages & behavior executed
前面 Phase 2 在 SW 做的事,最終都要回 Ava 這一端驗證真的發生了。這是整條流程的收尾,也是判斷「有沒有接起來」的依據。Everything Phase 2 set up on the SW side must finally be verified back on the Ava side. This closes the loop and is how you judge whether it "actually connected."
-
切回 Ava,選剛建的 Account / CampaignSwitch back to Ava and pick the Account / Campaign you just created
回到 Ava Messenger,用頂部 Cascader 選 Phase 1 建的 Account,再進入該 Account 下的 Campaign(SW 端 Asset 的
Campaign下拉選的就是這個)。選了會router.push('/')進 Campaign Dashboard,左側選單同時切換成「情境 B · Campaign 內選單」。Back in Ava Messenger, use the top Cascader to pick the Account from Phase 1, then enter a Campaign under it (the same one the SW Asset'sCampaigndropdown selected). Selecting does arouter.push('/')into the Campaign Dashboard, and the left sidebar switches to the "Context B · in-campaign" menu. -
到 Conversations 看對話是否出現Open Conversations and check the thread appears
左側 Conversations →
/campaigns/{cid}/conversations。確認剛匯入的聯絡人有出現一則對話,且SW 觸發的首則訊息(Asset 的 Template 內容)已送達。若這個 Campaign 的 Settings → Bot tab 有綁 Bot,會看到 Ava 自動回話——這就是「Ava 行為有執行」最直接的證據。若 Bot 沒綁,只會看到單向的首則訊息(沒有自動應答),此時行為算「訊息送達但未應答」;詳見 Campaign Settings 詳解。Left sidebar Conversations →/campaigns/{cid}/conversations. Confirm each imported contact shows a conversation thread and that the first message triggered by SW (the Asset's Template content) was delivered. If this Campaign's Settings → Bot tab has a Bot attached, you'll see Ava auto-reply — the most direct evidence that "Ava behavior executed." With no Bot attached you'll only see the one-way first message (no auto-reply); in that case the status is "message delivered, not answered." See Campaign Settings detail. -
到 Stats 確認行為有執行Open Stats to confirm behavior executed
左側 Stats 群組:Call Performance Stats(所有角色可見)看發送/通話數;Conversion Stats(Owner/AccountAdmin)看轉換。計數 > 0 代表 Action 確實被觸發並送到 Ava 執行。也可回帳號層 Stats 看 Campaign Performance 當整體對照。Left sidebar Stats group: Call Performance Stats (all roles) for send/call counts; Conversion Stats (Owner/AccountAdmin) for conversions. A count > 0 means the Action was actually triggered and executed on the Ava side. You can also check account-level Stats → Campaign Performance for an overall comparison.
-
通過標準(什麼算「接起來了」)Pass criteria (what counts as "connected")
同時滿足以下即算成功:
① Contacts-27 看得到匯入的聯絡人(資料有進 SW);
② Ava Conversations 看得到對話 + 首則訊息已送達(訊息有到 Ava);
③ Ava Stats 計數 > 0(Action 確實被觸發執行);
④ (若有綁 Bot)Conversations 看得到 Ava 自動回話(Bot 行為有執行)。Success means all of the following hold:
① Contacts-27 shows the imported contacts (data made it into SW);
② Ava Conversations shows the thread + the first message delivered (the message reached Ava);
③ Ava Stats count > 0 (the Action was actually triggered and executed);
④ (if a Bot is attached) Conversations shows Ava auto-replying (Bot behavior executed).
沒動?依這個順序排查:Nothing happened? Debug in this order:
1. Action 有沒有建、有沒有指派給 Segment——最常見原因(匯入了卻沒動多半是這)。
2. App Integration 的 Account ID 是否填對 Ava Account ID、Sandbox 是否有勾(stg 環境必勾)——填錯或沒勾 Sandbox,SW 查不到 Ava Campaign、Action 呼叫 Ava 也會失敗。
3. Asset 的 Campaign 下拉有沒有選到正確的 Ava Campaign。
4. Campaign Settings 的 P0 有沒有設——Bot 沒綁就沒有自動回話;Conversation Channel 不對訊息走錯路徑。
5. 門號有沒有綁、營業時段(Business Hours)/ TCPA / Holiday 是否 Follow——Follow 模式下遇到非營業時段會 Queued 到下次可用時段,看起來像「沒發」。
6. Segment Trigger 的 Enabled 有沒有開、Type/Schedule 設對沒。
7. 美加號碼:A2P(10DLC)有沒有 Approved——SW/Ava 兩端 log 都顯示「已送出」、Stats 計數也 > 0,但客戶就是收不到簡訊,十之八九是這個:電信商在看不見的那一層把訊息過濾掉了。
1. Was the Action created and assigned to the Segment? — the most common cause of "imported but nothing happened."
2. Is the App Integration's Account ID actually the Ava Account ID, and is Sandbox checked (required in stg)? — wrong value or missing Sandbox means SW can't list Ava Campaigns and Action calls to Ava fail.
3. Did the Asset's Campaign dropdown pick the right Ava Campaign?
4. Are the Campaign Settings P0 items set? — no Bot, no auto-reply; a wrong Conversation Channel sends messages down the wrong path.
5. Is a number bound, and are Business Hours / TCPA / Holiday set to Follow? — under Follow, off-hours sends are Queued to the next available slot and can look like "nothing sent."
6. Is the Segment Trigger Enabled, with the right Type/Schedule?
7. US/Canada numbers: is A2P (10DLC) Approved? — both SW and Ava logs show "sent" and Stats counts are > 0, yet the customer never got the text — nine times out of ten this is it: the carrier silently filtered it at a layer neither system can see.